Using Devise and the Cequel ORM to authenticate your users using a Cassandra database
Devise is a “flexible authentication solution for Rails”, while Cequel is a Ruby ORM for Cassandra that uses CQL3 (Cassandra Query Language). We’ll set these up together to achieve our goal: authenticating users of a Rails app using a Cassandra database to store their credentials.
This is rather a “high-level” tutorial: I assume you already know Ruby on Rails, that you can find your way around on Github to install tools and find information about a gem, and so on.
I do go into some details concerning Devise, but beginners might get lost in the way!
Getting started
Use ccm to create and start a local cluster of Cassandra nodes:
ccm create cequel-auth -v 2.0.9 -n 3
ccm start
Note: you could go with a single node (instead of the -n 3 argument) on a dev environment.
Create a new Rails 4 app, skipping ActiveRecord files:
rails new cequel-auth --skip-active-recordAdd the following gems to your Gemfile:
gem 'devise'
gem 'cequel'
Install them, and we’ll be set!
bundle installCequel configuration
Generate the default configuration file:
rails g cequel:configurationOpen config/cequel.yaml and tune the settings if needed. For this tutorial, the defaults are good enough (we’ll use the dev environment only):
development:
    host: '127.0.0.1'
    port: 9042
keyspace: cequel_auth_developmentOnce you’re happy with your settings, run the rake command to create the app’s keyspace:
rake cequel:keyspace:createUser model
We’ll generate a User model with the following attributes:
email— that will be our partitioning keyusernameencrypted_password
Cequel provides a generator to create new models, so we’ll just use that for starters!
rails g cequel User email:varchar username:varchar encrypted_password:varcharWe have to modify the generated app/models/user.rb file though, because the generator’s template uses a UUID column as the partition key and it’s not configurable.
Have your User model file resemble this one:
# -*- encoding : utf-8 -*-
class User
  include Cequel::Record

  key :email, :varchar
  column :username, :varchar
  column :encrypted_password, :varchar
  timestamps
endThe id key column is removed, and we’ve made the email one our partition key. The timestamps directive has been added too, so that we get created_at and updated_at for free just as with Active Record.
Run the following Rake task to synchronize the database schema with our new model:
rake cequel:migrateThis will look into app/models and make sure our database is synced with everything that is defined here.
We can now start worrying about getting Devise in the game. Our User model has the required attributes to comply to the Authenticable module of Devise.
You’ll need to add other attributes in order to support the other modules; see this wiki page for reference.
Configuring Devise
First, run the devise generator:
rails g devise:installWhen it’s done, it will output a number of configuration advice. Take a look at them, I’ll let you decide whether they are relevant to your app.
Because we used the --skip-active-record option, Devise generated a buggy configuration file.
Open config/initializers/devise.rb and locate the following line at the beginning of the file:
require 'devise/orm/false'This line loads the ORM adapter to allow Devise to communicate with our database. Luckily, there’s an adapter for Cequel. Unfortunately, it currently has a bug that prevents it from working well with Devise.
Luckily, I’ve fixed it ☺
Change the above line to the following:
require 'cequel-devise'To make this work, add the following adapter gems to your Gemfile and run bundle install:
gem 'orm_adapter-cequel', git: 'git@github.com:olance/orm_adapter-cequel.git'
gem 'cequel-devise'At the very beginning of the config/initializers/devise.rb initializer file, uncomment the config.secret_key line.
Making them work together
This is the very simple part of it all. There’s a single line of code to add to our User model:
# -*- encoding : utf-8 -*-
class User
  include Cequel::Record

  # Tell Devise that our User can authenticate and
  # register using credentials stored in the database
  devise :database_authenticatable, :registerable

  key :email, :varchar
  column :username, :varchar
  column :encrypted_password, :varchar
  timestamps
endViewing something…
We’ll now add a view and routes to actually try things out.
Our website will simply display a single page asking the visitor to log in/sign up if he’s not authenticated, and welcoming him otherwise.
Let’s create a HomeController for this purpose:
rails g controller home indexEdit the routes files to make the home#index action the root route:
Rails.application.routes.draw do
  devise_for :users
  root to: 'home#index'

  # -- delete this line the generator created
  # get 'home/index'
endWe’re also asking Devise to generate routes for User authentication.
Time to edit the home#index view. It’ll be really slim, we just want to verify that everything is working right. We’ll also add flash messages to our application layout:
<!DOCTYPE html>
<html>
<head>
  <title>CequelAuth</title>
  <%= stylesheet_link_tag    'application', media: 'all', 'data-turbolinks-track' => true %>
  <%= javascript_include_tag 'application', 'data-turbolinks-track' => true %>
  <%= csrf_meta_tags %>
</head>
<body>

<p class="notice"><%= notice %></p>
<p class="alert"><%= alert %></p>

<%= yield %>

</body>
</html><% if user_signed_in? %>
<h1>Hello, <%= current_user.username %>!</h1>
<p>
<%= link_to 'Log out', destroy_user_session_path, method: :delete %>
</p>
<% else %>
<h1>Hello, stranger.</h1>
<p>
Please <%= link_to 'log in', new_user_session_path %>
or <%= link_to 'sign up', new_user_registration_path %>
</p>
<% end %>This is nothing but regular Devise stuff: user_signed_in? allows us to render different content if the user is logged in.
When he is, we display his username and a link to log him out (note the method: :delete part!). When he’s not, two links allow the visitor to either log in or sign up.
Let’s try!
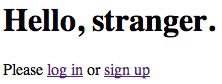
Spawn a new server and go to http://localhost:3000:
rails sThis is what you should see:
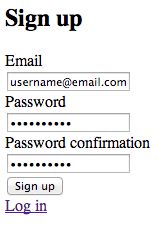
Click sign up and fill up the form:
Upon validation, you should be brought back to the welcome page and it should render differently:
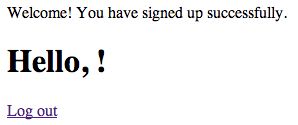
Well done! But, wait… where’s my user name?!
As you may have guessed, the above forms are provided by Devise. By default, Devise will register a user with as little information as the user’s email and password. The rest is up to us.
Still, you can try to click “Log out” and then “log in” to see that we’ve achieved the goal of this tutorial!
As a bonus for those not really acquainted with Devise, here is how to ask a new member for his username.
Customizing Devise registration form
The first step to customize any Devise view, is to make them available:
rails g devise:viewsAll the views Devise uses to interact with your users are now available in app/views/devise.
What we want to change is the registration form, so let’s have a look at app/views/devise/registrations/new.html.erb:
<h2>Sign up</h2>

<%= form_for(resource, as: resource_name, url: registration_path(resource_name)) do |f| %>
  <%= devise_error_messages! %>

  <div><%= f.label :email %><br />
  <%= f.email_field :email, autofocus: true %></div>

  <div><%= f.label :password %> <% if @validatable %><i>(<%= @minimum_password_length %> characters minimum)</i><% end %><br />
    <%= f.password_field :password, autocomplete: "off" %></div>

  <div><%= f.label :password_confirmation %><br />
    <%= f.password_field :password_confirmation, autocomplete: "off" %></div>

  <div><%= f.submit "Sign up" %></div>
<% end %>

<%= render "devise/shared/links" %>This is a pretty regular form, just like you should be used to!
We’re going to add a field here, to ask the user for his username. We’ll name it after the attribute name we used in the User class: username.
<h2>Sign up</h2>

<%= form_for(resource, as: resource_name, url: registration_path(resource_name)) do |f| %>
  <%= devise_error_messages! %>

  <div><%= f.label :username %><br />
  <%= f.text_field :username, autofocus: true %></div>

  <div><%= f.label :email %><br />
  <%= f.email_field :email %></div>

  <div><%= f.label :password %> <% if @validatable %><i>(<%= @minimum_password_length %> characters minimum)</i><% end %><br />
    <%= f.password_field :password, autocomplete: "off" %></div>

  <div><%= f.label :password_confirmation %><br />
    <%= f.password_field :password_confirmation, autocomplete: "off" %></div>

  <div><%= f.submit "Sign up" %></div>
<% end %>

<%= render "devise/shared/links" %>This is not enough though, because of the strong parameters feature of Rails: the username parameter is not permitted and thus, will not make it past the controller.
There is documentation about that. What we need to do, is tell Devise to permit username when signing up. This is done in the ApplicationController:
class ApplicationController < ActionController::Base
  # Prevent CSRF attacks by raising an exception.
  # For APIs, you may want to use :null_session instead.
  protect_from_forgery with: :exception

  before_action :configure_permitted_params, if: :devise_controller?

  protected
  def configure_permitted_params
    devise_parameter_sanitizer.for(:sign_up) << :username
  end
endLines 6 to 11 have been added to the original file. We ask Rails to execute configure_permitted_params before each action of the DeviseController. In this method, we just add :username to the list of permitted params for the sign up action, using a “parameter sanitizer” Devise provides us.
Try to go to the sign up form again, and you should be able to register with a username (which can be any text really):
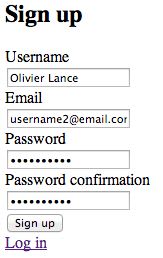
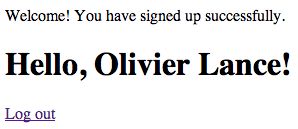
Once posted, the form brings me back to the home page where I am properly greeted!
This is it!
You now have a base application that accepts user registration and authentication with a Cassandra backend.
Bringing the pieces together was not as difficult as I thought it would be; we’re lucky to have a very active Ruby community that provides all the foundations needed to work with the best tools powering today’s Web 🙂
