Server-side rendering of React components to improve SEO and minimize your web app initial loading time.
Update 16 Jan. 2016
It’s been more than a year since this tutorial has been published, so I have updated to reflect the latest evolutions of the different libraries that are used here.
The complete code for this tutorial is available here.
Background & goals
I tend to like trying out new technologies.
During the past year or so, I have been developing some little javascript-heavy projects, using CoffeeScript, Backbone, Node.js, Mustache, Grunt, Yeoman… all the buzzy libraries/frameworks we hear about nowadays!
I remain a huge fan of Ruby on Rails though; I find it more mature.
However, because I believe heavy clients have their advantages for the user (better interactions, shorter perceived response times, …), I’ve always wanted to smartly integrate a Javascript framework with Rails so that I’d get the best of both worlds.
By smartly, I mean:
- most importantly: Most of the time, the server spits out some HTML and lots of Javascript with a bootstrap script that inits a router. This router kicks in at page load and displays the correct view for the requested URL.I want my server app to be able to respond to any route and render the page for it without any client-side rendering. The Javascript app would then plug itself onto the generated DOM and do its stuff.
This is important for good SEO, but also for overall performance and shorter initial loading time. - Doing so, I want to have a single set of views for both the server- and the client-side renderings.
I do have an app in production that renders regular ERB views, which include Javascript code that will then update the view using jQuery Templates looking exactly like the partials composing the view… describing it already is a nightmare!
Staying DRY is key to good maintainability and I intend not to repeat this error again. - If possible and for the same reason, I’d like to maintain a single set of routes.
What I am looking for has a name: isomorphic app.
I know a full Javascript stack would provide this easily. But I still have to find a Node-based framework that can compete with Ruby on Rails as far as simplicity, productivity and DRY-ness are concerned. Suggestions welcome!
Promising discoveries
I’m now starting a new project, so I’ve been searching around the Web for this holy grail…
The world of Javascript MVC frameworks is vast. A non-exhaustive list can be found on the TodoMVC website. Long story short, I considered many of them and finally decided I should try using React, the library backed by Facebook and Instagram.
What seduced me is that in all this buzz of MVC frameworks, React comes in and shows us there’s another way to do what we’ve been doing for years. React is not an MVC framework. It promotes what they called the Flux architecture, which enforces a unidirectional data-flow to improve consistency and maintainability of the apps. You should watch the presentation video.
Their arguments made a lot of sense to me, so I dug further and found resources about server-side rendering, and their own react-rails gem to integrate React with Ruby on Rails.
What’s in there for you?
I am starting this series of articles to share my discoveries and the steps to reach the goals I have set above, using React and Ruby on Rails.
I’ll try to pass on some basics and practices of React as an introduction to the framework along the way.
We’ll build a very simple blog together. This first part will cover the project setup and a first view listing the available posts, with React components and server-side rendering.
In a second part, we’ll move more view stuff into React components, add some routing, and add another view to show individual posts.
The third and final part will add interaction and dynamism to the whole thing, so that people can write posts and comment them.
So, on with the show, let’s create our Rails app:
$ rails new isomorphic-reactjs
Server-side Javascript environment
We are going to need a Javascript execution environment to perform server-side rendering of our React components.
Rails comes with ExecJS by default. It’s a wrapper that runs different Javascript runtimes from Ruby. The therubyracer gem is historically included in any Rails Gemfile to be used with ExecJS.
However I have found in my tests that therubyracer had a strange behavior, and while investigating this I found that Heroku actually recommend not to use it anymore because of memory issues.
So what I’d recommend today is to install NodeJS on your system and let ExecJS use that automatically. Make sure therubyracer is commented out or removed from your Gemfile!
Adding React to our Rails app
We can now proceed with integrating React to our Rails app.
Let’s add a gem to our Gemfile to use React and its server-side rendering feature:
gem 'react-rails', '~> 1.5.0'
The react-rails gem provides:
- The React Javascript file(s).
- “Compilation” of JSX files in Rails assets pipeline.
- An unobtrusive Javascript script (react_ujs) that can automatically mount React components from existing DOM elements with specific data-* attributes, effectively fulfilling my requirement that the Javascript app should be able to initialize its state from existing HTML from the server.
- A view helper to generate DOM elements compliant with the above script expectations, making it easy to place React components directly in the views. This helper accepts a prerender option, which triggers the server-side rendering of components that use it.
On to the next step:
$ bundle install
Easy, right? ☺️
The react-rails gem provides a generator to set things up in your app. So when you run:
$ rails g react:install
… here’s what happens:
- react and react_ujs are added to your application.js file
- A components directory is created in app/assets/javascripts; this is where you’ll organize your React components
- The file components.js is added to your Javascript assets. react-rails will load that file to load your components.
The gem provides two variants of the Javascript library: a minified one for production, and an unminified one to make debugging easier. We have to tell React which variant it should serve depending on our environment.
Add the following configuration in config/environments/development.rb:
# React development variant (unminified)
config.react.variant = :development
In config/environments/production.rb:
# React production variant (minified)
config.react.variant = :production
This is it! Our app is ready to render and serve React components.
We’ll need some data to display in our components first, so let’s create a model.
A “blog” app
Our “blog” will be a very simple one. For the moment, it will just display a list of posts in chronological order. Each post will have:
- A title
- An author
- Some text contents
- A creation date
Let’s create this model as a resource with the adhoc Rails generator:
rails g resource Post title:string author:string contents:text
We’ll come back to the created files in a minute. First, add a few posts in our database using db/seeds.rb:
p = Post.new(title: 'My first post!', author: 'Olivier Lance')
p.contents = <<EOF
Lorem ipsum dolor sit amet, consectetur adipiscing elit. Pellentesque suscipit justo iaculis lorem feugiat malesuada. Sed bibendum iaculis arcu, quis ultricies sem pellentesque at. Fusce lobortis tincidunt risus, vel mollis leo. Sed tempus placerat eleifend. Ut dictum gravida magna, nec viverra felis varius eu. Curabitur molestie non tortor et eleifend. Sed bibendum tincidunt purus, nec euismod dolor congue id. Nam eleifend, eros ut rutrum posuere, turpis metus condimentum purus, in tincidunt justo neque at turpis. Praesent ut egestas elit. Donec bibendum pretium justo vitae suscipit. Donec nec lacus eleifend tellus porttitor malesuada.
Morbi ultricies fringilla velit eu auctor. Quisque at nibh vitae tellus placerat placerat. Donec tempor tellus ac tellus sagittis, in pulvinar lacus varius. Fusce porttitor mauris quam, in imperdiet urna mollis quis. Etiam vel lacinia risus. Cras tellus mi, hendrerit eu suscipit sit amet, interdum vel libero. Nullam vulputate condimentum felis vitae tempus. Vivamus ullamcorper lacus vitae nibh rhoncus bibendum. Curabitur ex elit, viverra non sodales placerat, congue id ex. Etiam rhoncus eros ac mi blandit, ut vehicula nibh tempus. Aenean vehicula velit vitae tellus gravida sodales. Praesent congue vestibulum elit quis imperdiet.
EOF

p.save


p = Post.new(title: 'Guest post', author: 'John Doe')
p.contents = <<EOF
Lorem ipsum dolor sit amet, consectetur adipiscing elit. Pellentesque suscipit justo iaculis lorem feugiat malesuada. Sed bibendum iaculis arcu, quis ultricies sem pellentesque at. Fusce lobortis tincidunt risus, vel mollis leo. Sed tempus placerat eleifend. Ut dictum gravida magna, nec viverra felis varius eu. Curabitur molestie non tortor et eleifend. Sed bibendum tincidunt purus, nec euismod dolor congue id. Nam eleifend, eros ut rutrum posuere, turpis metus condimentum purus, in tincidunt justo neque at turpis. Praesent ut egestas elit. Donec bibendum pretium justo vitae suscipit. Donec nec lacus eleifend tellus porttitor malesuada.
EOF

p.save

p = Post.new(title: 'Closing my blog... :(', author: 'Olivier Lance')
p.contents = <<EOF
Lorem ipsum dolor sit amet, consectetur adipiscing elit. Pellentesque suscipit justo iaculis lorem feugiat malesuada. Sed bibendum iaculis arcu, quis ultricies sem pellentesque at.
EOF

p.save
Migrate the database and seed it:
$ rake db:migrate
$ rake db:seed
Now we’ll customize the files the generator created for us. A resource route has been added to config/routes.rb. We only need the index route for the moment, and we’ll tell Rails to use this route as our homepage:
resources :posts, only: :index
root to: 'posts#index'
Add the index action to match this route in app/controllers/posts_controller.rb:
class PostsController < ApplicationController

  def index
    # Fetch all posts
    @posts = Post.all
  end

end
Finally, create the app/views/posts/index.html.erb view file and leave it empty.
Creating React components
We have the base for our React application. Before creating components though, it is important to understand how they should be used.
Components in React are there to enforce the Separation of Concerns we all love. A React app is a hierarchy of components, fragmenting the app into smaller parts representing states of your data at any given time.
It is a robust concept because of one thing, the idempotency of those components: a component rendered with the same data over and over again will always look the same.
Doing this, your app can never go wrong, because you only describe what it looks like for each possible state of the data it presents to your users. So if you make sure your data remain consistent, you indeed make sure that the app always looks like it’s supposed to. This is what the Flux architecture has been designed for.
That’s really a quick and incomplete recap of the concepts behind React. You should read their tutorial and Thinking in React if you have not read them yet. Go ahead, I’ll wait for you!
Right. So, we need to break our app apart into components. I’ve done it for you below, using colored boxes just like they did in the last link 🙂
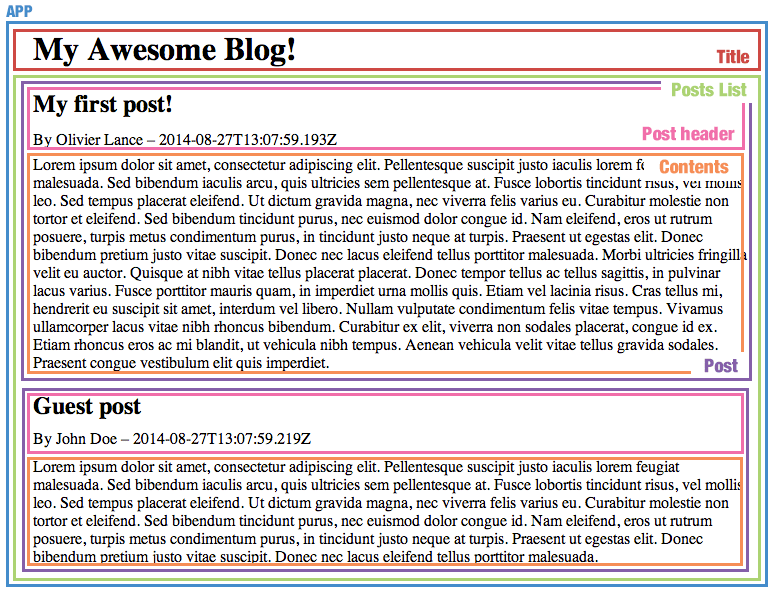
This is what we aim for. To simplify this first tutorial and focus on our main goal to render components on the server, we’ll limit ourselves to the Posts List, Post, Post Header and Post Contents components. We’ll improve on that in the next article.
The PostsList component
This component is only a container for posts. With Rails, we would generally just use a <div> with a “posts” class and place our posts inside it using a collection of partials.
This is exactly what we will do here, only it will be in a React component instead of an ERB view.
Create the app/assets/javascripts/components/posts_list.js.jsx file and copy the following code in:
var PostsList = React.createClass({
    getInitialState: function() {
        return { posts: this.props.initialPosts };
    },

    render: function() {
        var posts = this.state.posts.map(function(post) {
            return <Post key={post.id} post={post} />;
        });

        return (
            <div className="posts">
                {posts}
            </div>
        );
    }
});
Note that if I were to develop my own React app today, I would use React with ES6. In the context of this tutorial, I don’t want to lose any reader that has not yet leveled up to ES6, so I’ll stick to ES5.
So this is what a component looks like. React.createClass is the function to create new component classes, and we store those component classes in global variables that React can access later.
The render method is the only mandatory piece of code your component must contain. Its responsibility is to describe what it should look like at the time the function is called, using its properties and its state.
Important note about this global variable thing: I am not an advocate of using globally accessible objects. We’ll improve on that later by using a Javascript dependency manager.
Properties and states
Data in React flows from the top components down to their children. There are two types of data elements: properties and states.
Properties are pieces of data provided to a component by its parent component. Properties are immutable: they’re used by components to know how they should render themselves, but cannot be changed.
The state of a component is the mutable part of the data it represents. This is the data that may change over time because the user interacted with the component, or it got a response from a server request for instance.
Changing the state of a component, using the setState function, triggers a re-rendering of the component.
Let’s consider Facebook’s Like Button as an example:
Properties for this button, provided by its parent component, could be:
- The size of the count box and size of the button
- The color of the button
- The localized text to display
- The initial displayed count
- Whether the current page has already been liked by the current visitor
These are no data the button will act upon. It will use them to render itself properly. However, it needs to render differently if it is liked or not, and the like count might change over time, notably when the user clicks the button.
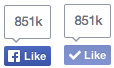
The screenshot I used for the button makes it very intuitive. This is the same button, rendered twice in two different states.
So the states of Facebook’s Like Button are:
- Liked or not?
- Like count
What about the two last properties then? Is it not redundant with the above state? Well it is not. To render itself for the first time, the component needs to be given all the data it has to represent, or have default values for them.
The like count and liked states could not have meaningful default values, as they change over time, so the parent component tells its Like Button: “here, you have been clicked 851 thousand times and this visitor in front of you has not clicked you yet!”. To which the Like Button replies: “thanks, I’ll use that as my initial state and let’s see what happens!”.
In other terms, the button component will derive its initial state from some of the given properties, and render itself based on this state. Later, when the user clicks the button, it can then change its like count and its liked state, which are mutable, triggering a re-render that’ll make it look like the second button in the screenshot.
Back to PostsList
If you look back at the posts_list.js.jsx file, you’ll probably have a better understanding of what’s going on:
- The component will receive an initial list of posts as a property, and make it its initial value for the posts state in getInitialState.
- When it’s time to render, the component goes through its posts list in its current state (using this.state.posts) and create a new Post component out of each post in the list.
- It then returns the markup that will be used to represent itself, basically including the posts array inside a div.
You have probably noticed that my Javascript contains raw HTML-like content. The JSX format allows us to do so. It is transformed by React to a real Javascript file where all raw markup is mapped to function calls that will build a virtual DOM that React uses to finally display our components.
As you can read in the docs, you don’t have to use JSX, but I personally find it clearer than plain Javascript.
The Post component
Our PostsList component contains as many Post components as there are posts to display. So that may be the right time to implement it.
Once again, this component is more a container for other components than anything. Here is its code, in a new app/assets/javascripts/components/post.js.jsx file:
var Post = React.createClass({
    render: function() {
        return (
            <div className="post">
                <PostHeader post={this.props.post} />
                <PostContent post={this.props.post} />
            </div>
        );
    }
});
Even simpler than PostsList! This is what we call a stateless component: it has no state, just properties that it uses to render itself. In our case, just one property, post, that you can see we had set in the PostsList component when we wrote:
<Post key={post.id} post={post} />
(key is also a property, but it’s used internally by React.)
Similarly the post data, stored in its eponymous property, is pushed down to the Post children components.
If I have not lost you already, you should now be waiting for the PostHeader and PostContent components. We’ll go quickly over them.
PostHeader and PostContent components
I have placed them both in the same file as the Post component, as they don’t really have sense outside a Post.
These two components will actually display our data, using the post property given to them by their parent.
Here is the PostHeader component:
// ...

var PostHeader = React.createClass({
    render: function() {
        return (
            <div className="post-header">
                <h2>{this.props.post.title}</h2>
                <div className="post-meta">
                    By {this.props.post.author} – {this.props.post.created_at}
                </div>
            </div>
        );
    }
});
Just as planned, it displays the post title, its author and its creation date.
The PostContent component is in charge of the post’s text:
// ...

var PostContent = React.createClass({
    render: function() {
        return (
            <div className="post-contents">
                {this.props.post.contents}
            </div>
        );
    }
});
And this is it! We now have all our components, ready to be rendered.
Time to render
As I mentioned earlier, the react-rails gem provides us with a helper to mount components in our views.
We will use it to display all our posts within a PostsList component, inside our posts index view. Let’s add the following code to app/views/posts/index.html.erb:
<%= react_component('PostsList',
                    { initialPosts: @posts },
                    { prerender: params[:noprerender].nil? }) %>
It couldn’t be simpler. We’re asking for the PostsList component, to which we provide a collection of initial posts using @posts that the controller has fetched for us. Note that the key, initialPosts, matches the property name accessed in the getInitialState method of our PostsList component.
The prerender option will trigger the server-side rendering of the component if it is set to true. I have included a small condition that will allow the deactivation of pre-rendering using http://localhost:3000?noprerender=1.
That’s all there is to it. The PostsList will itself trigger the rendering of as many Post components as necessary, which in turn will render a PostHeader and PostContent component each, passing down the post data on the way.
Testing
To make sure everything is working as expected, we will alter the application layout (app/views/layouts/application.html.erb) like so:
<!DOCTYPE html>
<html>
<head>
  <title>An Awesome Blog</title>
  <%= stylesheet_link_tag    'application', media: 'all', 'data-turbolinks-track' => true %>

  <% unless params[:nojs] %>
    <%= javascript_include_tag 'application', 'data-turbolinks-track' => true %>
  <% end %>

  <%= csrf_meta_tags %>
</head>
<body>

<h1>My Awesome Blog!</h1>

<%= yield %>

</body>
</html>
I have added the title of our blog, and a condition on the Javascript tag inclusion, so that we can “deactivate” javascript on our website by using a nojs=1 parameter in our URL.
Let’s start a Rails server and check it out:
Now what happens if we deactivate both pre-rendering and Javascript?
Go to http://localhost:3000?nojs=1&noprerender=1:

Only the title shows up! Because we have no server-side rendering and no unobstrusive React script to load things up on the client, there’s nothing to be displayed. However, we can see that some markup has been generated:

This is the result of calling the react_component helper in our view.
So if we activate Javascript again, React should detect the markup and display our posts correctly. Let’s try it by loading http://localhost:3000?noprerender=1.
Our content is back, loaded and rendered by the client.
Our last test will be to check that our server actually does its job: what happens if we have no Javascript, but we do ask the server to prerender?
Check this out by loading http://localhost:3000?nojs=1. Once again, you should see the posts list, proving that the server has done its job rendering it for us before sending the HTML to the browser.
Performance
Please have a look at a slightly more educated test by Scott Bronson!
This cannot be taken as a serious benchmark at all but, using the Timeline pane of the Chrome Developer Tools, I have found that pre-rendering the page was consistently faster than relying on the Javascript to load and render the initial markup. I have noted a 40% average gain in loading speed from hitting “reload” to complete rendering of the page.
Below are two sample timings of a full page load:

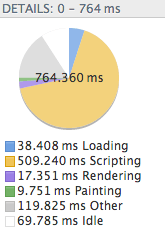
Once again, this is no serious benchmark, but it’s probably a hint on the advantages of rendering the initial markup on the server!
Next time…
This is the end of the first part of this series. I hope it’s been useful to you.
The next part will start from the blog in its current state and improve it a bit. We’ll “Reactify” our markup a little more, and add a router to handle page changes.
I am of course open to any question or suggestion concerning this article!
