Not so long ago, I was totally new to Kubernetes and GKE, the hosted Kubernetes service from Google. I learned what I needed to know on the job and by asking here and there to friends with more experience of k8s.
While I was learning to use Google Kubernetes Engine, I found useful to take notes of the different steps to spin up a cluster and deploy a service on it. Of course I made mistakes along the way, some that I couldn't go back and fix without doing everything again. I also learned a few tips.
So this is what I'm sharing here today: everything I wish I knew when I first started using Google Kubernetes Engine.
Recently, I needed to have a Wordpress instance running to perform some tests, so I used that opportunity to apply what I had learned and write this guide.
It will take you from nothing to a fully-functional Wordpress blog, with explanations of the key concepts/terms along the way.
Most of the steps will of course be valid for any service you want to deploy, and the Wordpress-specific stuff is adaptable to anything else pretty easily.
Also, note that there are much cheaper and much easier ways to deploy a Wordpress instance! I wouldn't do it to run an actual blog, but it was a good use case to learn and try things out 🙂
If you have any suggestion on how to improve those steps, or any tips on the subject, please share in the comments!
Part 1: the infrastructure
Some concepts first
One thing that I found hard at first, is that GKE is a wrapper around Kubernetes and as such, it uses both its own terminology and some Kubernetes jargon to name objects that are sometimes different, sometimes the same or very similar.
So let me try to untangle that jargon for you. I'll remain generic and everything might not make sense to you right away if you're totally new to Kubernetes, but hopefully it'll help you understand things better in the long run.
In Kubernetes-land
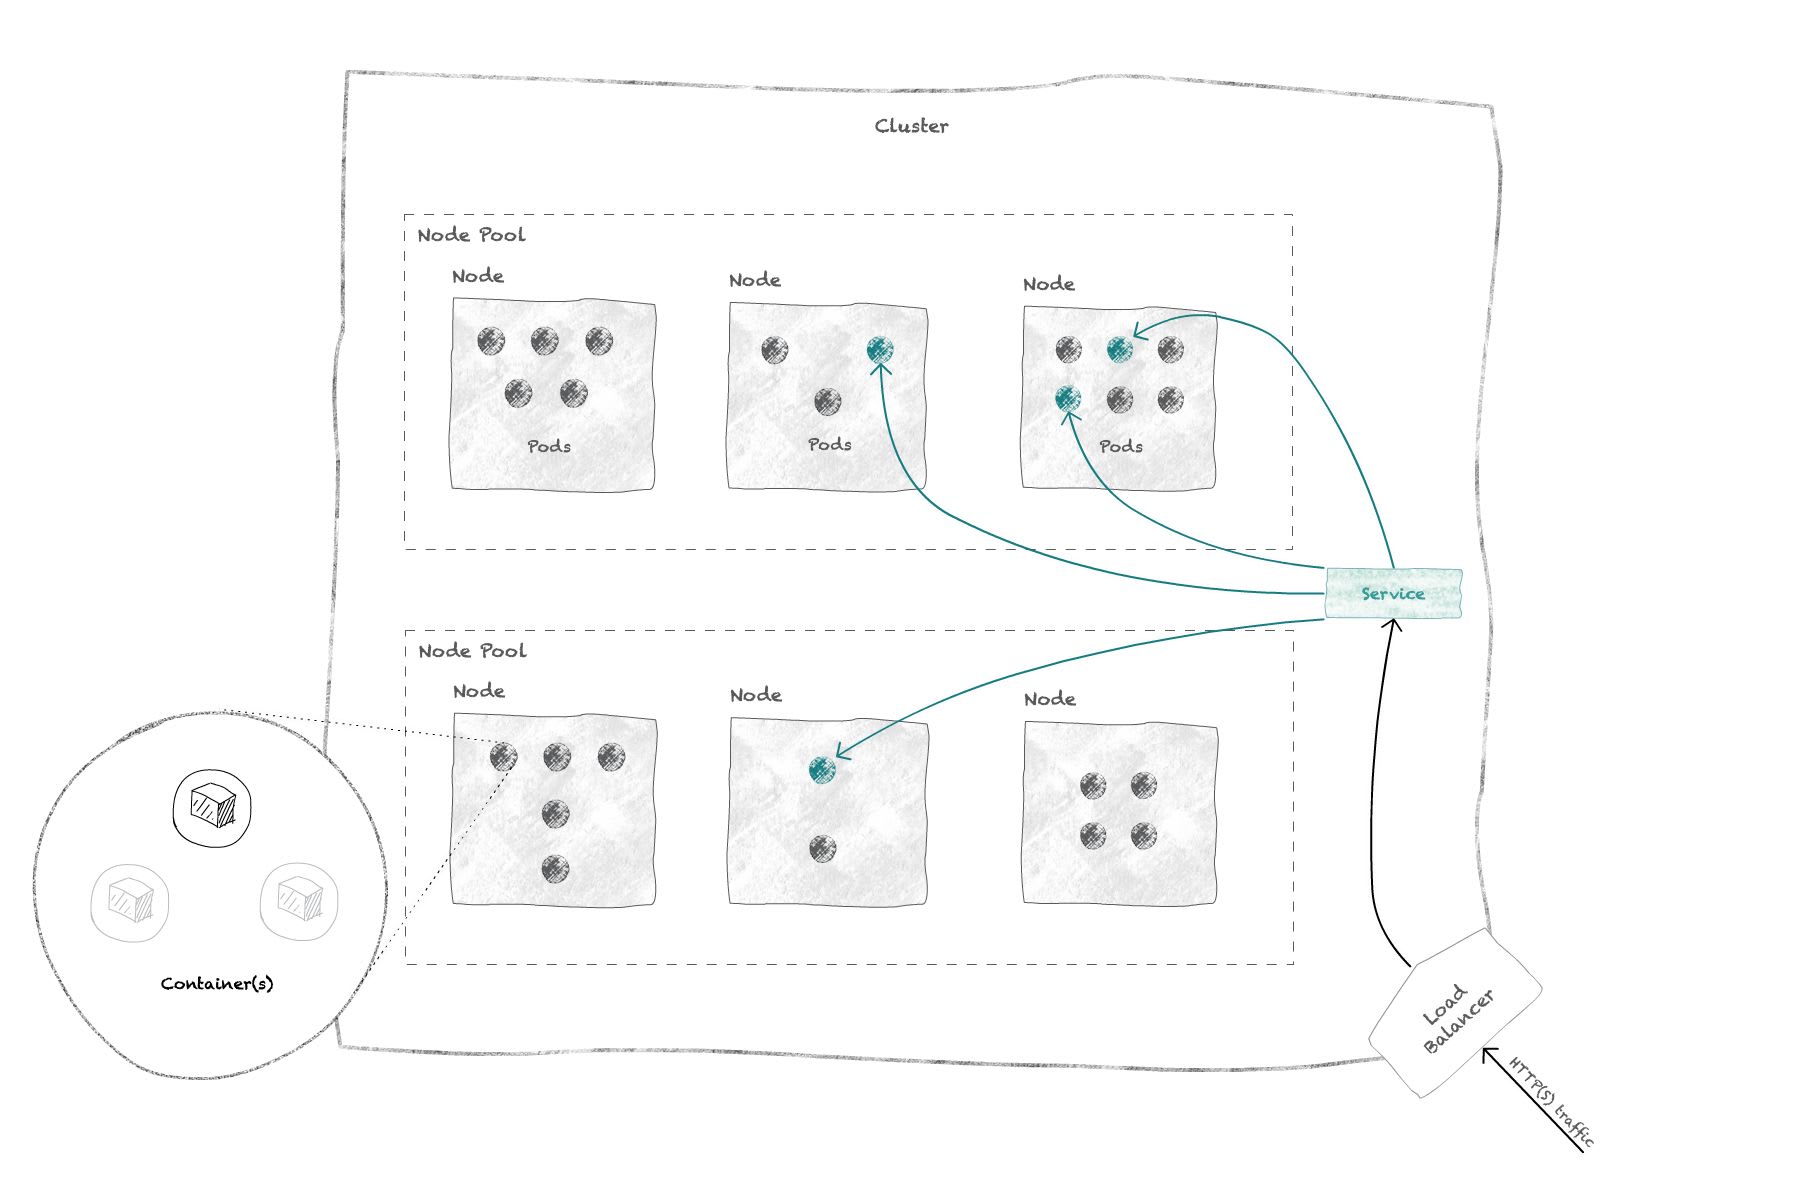
In Kubernetes, you deploy your containers (i.e. Docker images) within pods that are running on nodes, which are basically servers (bare-metal or VMs). Those nodes form a cluster, and one of them is going to be the master node, running specific pods for the administration of Kubernetes on the nodes.
Depending on the requirements you set on your deployment, a pod might be automatically replicated on different nodes of your cluster, usually to be able to process higher loads on your service/application.
To expose your deployment to other pods or to the Internet, you create services that act as a gateway between your pods and the exterior. If by "exterior" we mean the Internet, then you'll most probably need an ingress & ingress controller: they're the resources that expose HTTP/HTTPS traffic from the outside of the cluster to the services within it.
Note how "cluster" is not in bold in the paragraph above: a cluster is not an actual Kubernetes object; it's just that a group of nodes communicating with the same master forms what is called a cluster.

If you want to learn more about Kubernetes objects and concepts in general, head over to the documentation, which is very detailed.
In GKE-land
GKE brings its own concepts to the table, mainly to abstract a few things away and make the administration easier on your side.
In GKE, a cluster is the first thing you need to start using Kubernetes. It is the root resource for all other Kubernetes resources you'll create within your project to deploy and handle your apps.
In your cluster, you will create one or several node pools, which themselves group one or several nodes of similar characteristics (vCPU, Memory). Those nodes are Compute Engine VM instances automatically managed by GKE; they will host the pods that you deploy for your apps.
Deployments in GKE are named workloads.
Once your workload is up and running, you'll create one or more services to expose it to the outside or to other pods.
This might imply creating a load balancer, which under the hood is going to be a k8s ingress controller.
For a good starting point to learn more about GKE and its architecture, read GKE's cluster architecture documentation.
There is more...
But this should cover the essentials to get started. We'll cover the rest as it comes.
So let's start deploying Wordpress!
Create a new GCP project
If you haven't already, go to https://console.cloud.google.com and create your first GCP project. A project on GCP is the entity that gathers all the resources you might need to run your services, store static data, perform Machine Learning operations, and so on.
You can have multiple GCP projects to isolate resources for different apps or environments. I chose to create a "Playground" project to test things out:
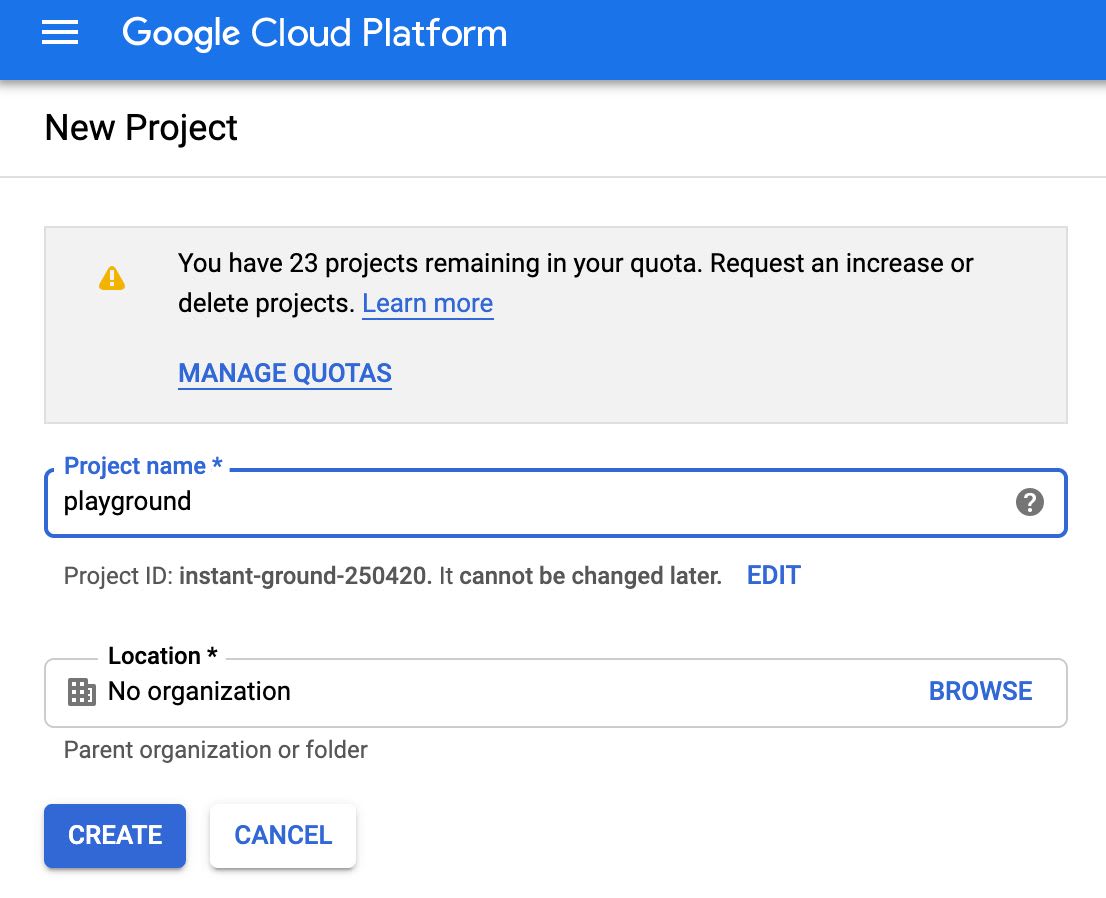
Setting an organization might be useful if you want to attach multiple projects to the same billing account and centralize permission access to multiple projects within your company.
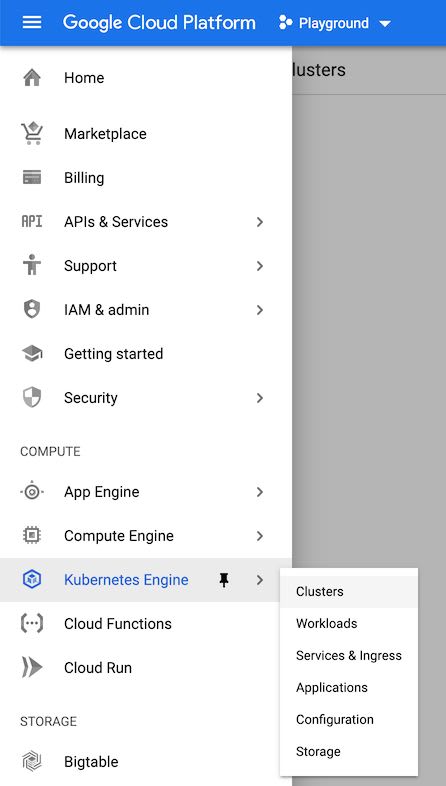
Creating a Cluster and its Node Pool
To get started with Kubernetes on GCP, you first need to create a Cluster and a first Node Pool.
Choose to create a cluster on the page that opens and choose a template on the left to get started. For tests, the "Your first cluster" template is great as it will create a minimal cluster with a single-node node pool with low RAM and low CPU requirements.
If you want to set up a production-ready cluster (or closer to it), choose the "Standard cluster" template or an other of the more specific templates.
Here's a little guide to the different options you can set on the creation form:
Location type

Like most cloud providers, Google splits the world in different regions, which are themselves split in 3 zones each.
A zonal cluster will have its nodes created within a zone of a single region. You have the option to distribute nodes throughout the region to its different zones, in which case you will automatically have the same number of nodes per zone.
A regional cluster will automatically distribute its nodes to the different zones of a chosen region. You have the option to unselect one or two zones if you want to, but again all zones will have to have the same number of nodes per zone.
The major difference between a multi-zone zonal cluster and a regional cluster resides in the way the master nodes are handled: a zonal cluster always has a single master node, meaning an outage in the zone hosting that node will make the entire cluster's control plane (i.e. Kubernetes API, scheduler, ...) unavailable.
In a regional cluster however, there's one master node created per zone, so your cluster remains managed and available until all three zones are down, which is quite unlikely.
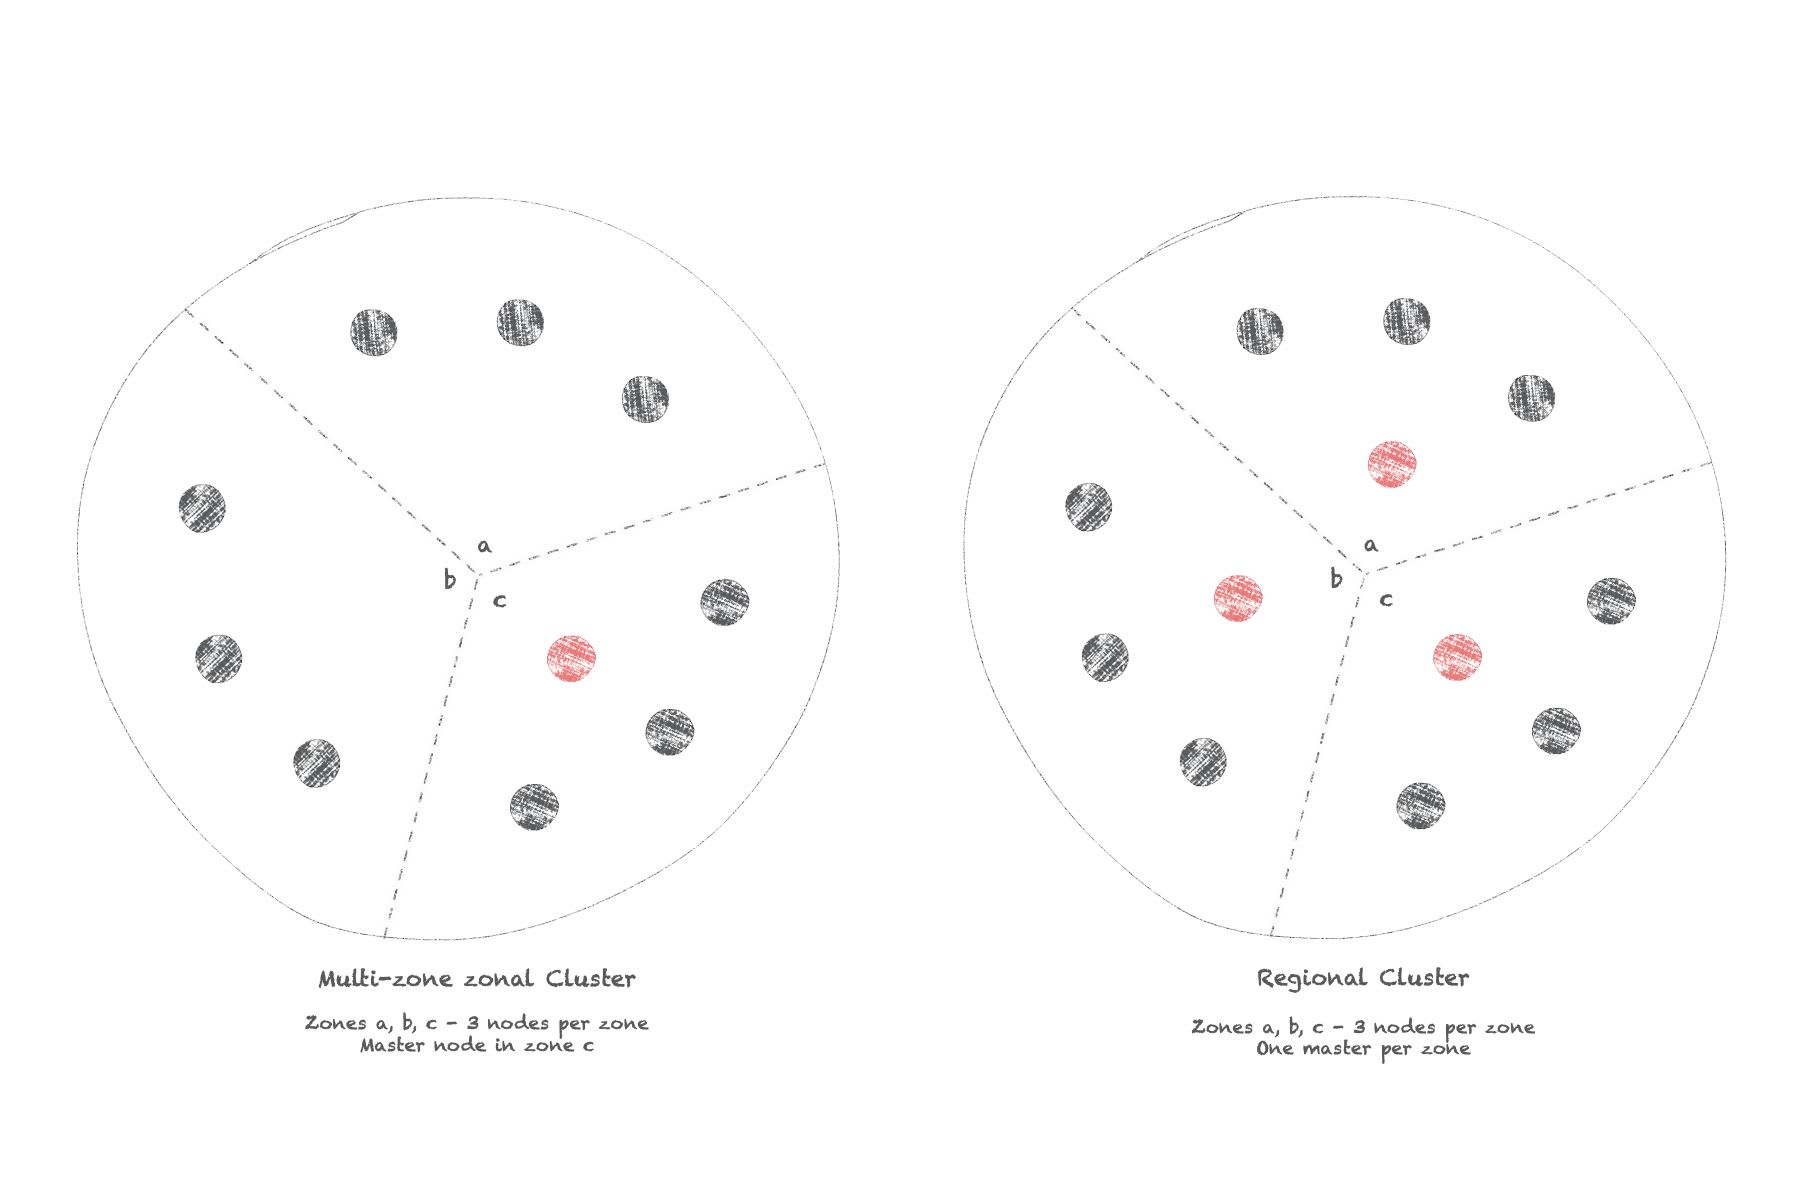
For tests and apps/services that don't require high availability, zonal clusters are OK. Regional clusters would be more suited for production/high-availability apps.
Zone/Region
Choose a zone or region that makes sense to your audience: the closer to your users the better, "users" being taken in the large sense of whatever/whoever is going to send requests to your apps/services.
Master version
This is the version of Kubernetes that will run on your master node.
Unless you have a good reason to do otherwise, choose the latest version.
Node pool configuration
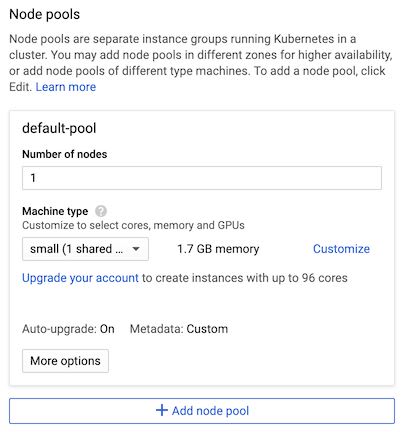
Your choices will depend on the resources you plan on using with your app.
For my tests, I'm using a single-node node pool with either a small VM instance or the n1-standard-1 instance, which is the smallest non-shared CPU instance type.
If you need more CPU or more RAM, just choose a larger instance type!
For a production cluster, you should plan on having a few nodes per zone so that you can handle both the load of Kubernetes system pods (which can take up a full node's resources when using the 1 vCPU type) and the load of your workloads, that you will be able to scale horizontally as well by running multiple replicas of your pods.
Important: access scopes
If you plan on using any Google Cloud API (Cloud SQL, Storage, Stackdriver, ...), you'll save yourself a lot of time by:
- Clicking the "More options" button
- Selecting "Allow full access to all Cloud APIs" under Security > Access scopes
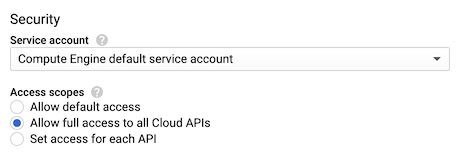
- Saving your changes in that panel
By default, access scopes restrict which Cloud APIs your workloads will have access to from within their cluster. Those scopes are quite limited, and extending them later is rather cumbersome.
As it turns out, this is more of a legacy way to handle access to those APIs. The way to go today is to use the IAM roles and Service Accounts features of GCP.
To make this easier, I always choose the full access option here so that I can more finely control what services are accessible to my workloads using IAM.
Other cluster configuration settings
You can leave the remaining options as they are; they should work fine for you in most cases.
If you want extra security, you can check the "Private cluster" option, but that will lead to a lot more configuration to make your master node accessible and to provide internet access to your nodes: because they won't have a public external IP address, you need to configure a NAT gateway to give them an outbound internet access.
For my tests, I tend to disable Stackdriver Monitoring/Logging in the advanced options, when I know I won't be using these features. It frees up some machine resources, but makes the logs less enjoyable to use.
If you're spinning up a production cluster, definitely keep Stackdriver on unless you plan on using another monitoring/logging solution.
You're now ready to click the "create" button!
It will take a few minutes for GCP to create your GKE cluster.
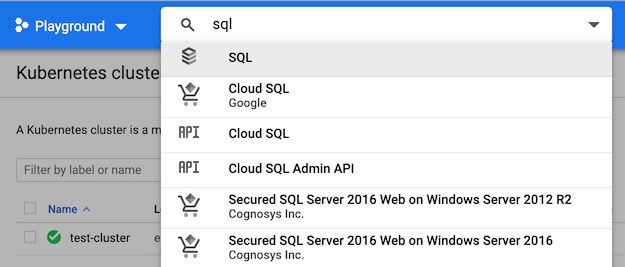
You can wait and watch, or maybe go to Cloud SQL and create a new DB instance 🙂
Create a Cloud SQL instance
Wordpress needs a MySQL database to run. You could deploy it within your GKE cluster but Google provides Cloud SQL: a fully managed MySQL (or Postgresql) service. We might as well use it!
Go to the Cloud SQL dashboard:
Basic configuration
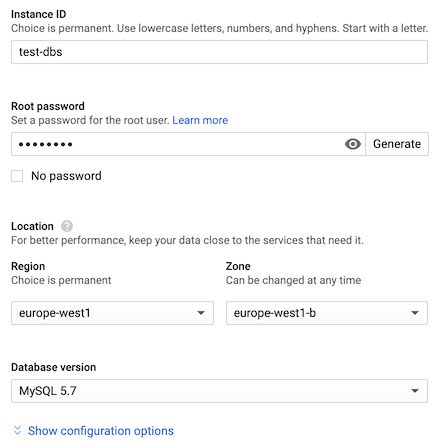
Click "Create instance", choose a MySQL instance and configure it:
- Choose a unique instance ID, which is not your database name but the name for the machine that will host one or several MySQL databases.
- Choose/generate a password for the MySQL
rootuser. - Locate your instance as close as possible to your cluster, which generally means in the same region/zone.
- Choose MySQL 5.7 unless you specifically need 5.6
Connectivity configuration
Now click show configuration options and open the Set connectivity section.
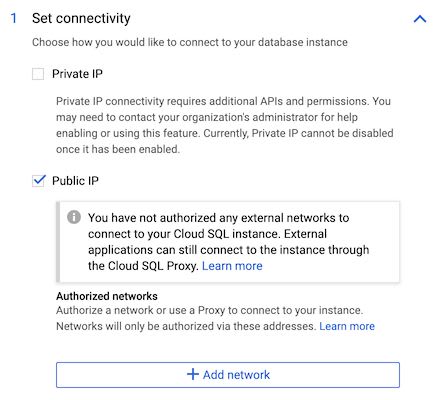
Public connectivity
By default, only the "Public IP" connectivity is checked, meaning our MySQL instance will only have an external public IP address generated for it. To protect your data, you can only connect to your instance through this external IP, if the address from which you're trying to connect is explicitly whitelisted in the configuration.
This is not ideal when connecting from your pods: the nodes they're hosted on have ephemeral IP addresses allocated to them, so they're subject to changing at any time. Unless you want to setup a NAT gateway to have a single public IP address for outbound traffic from your cluster, there's no practical way to configure the whitelist for your workloads to access the MySQL instance through its public connectivity.
That's why Google provides what they call the Cloud SQL Proxy, which is a container image that you can host in the same pod as your service that needs to access MySQL. The Cloud SQL Proxy automatically creates a tunneled connection to your Cloud SQL instance, and proxies any SQL requests made to it just as if MySQL was running on localhost.
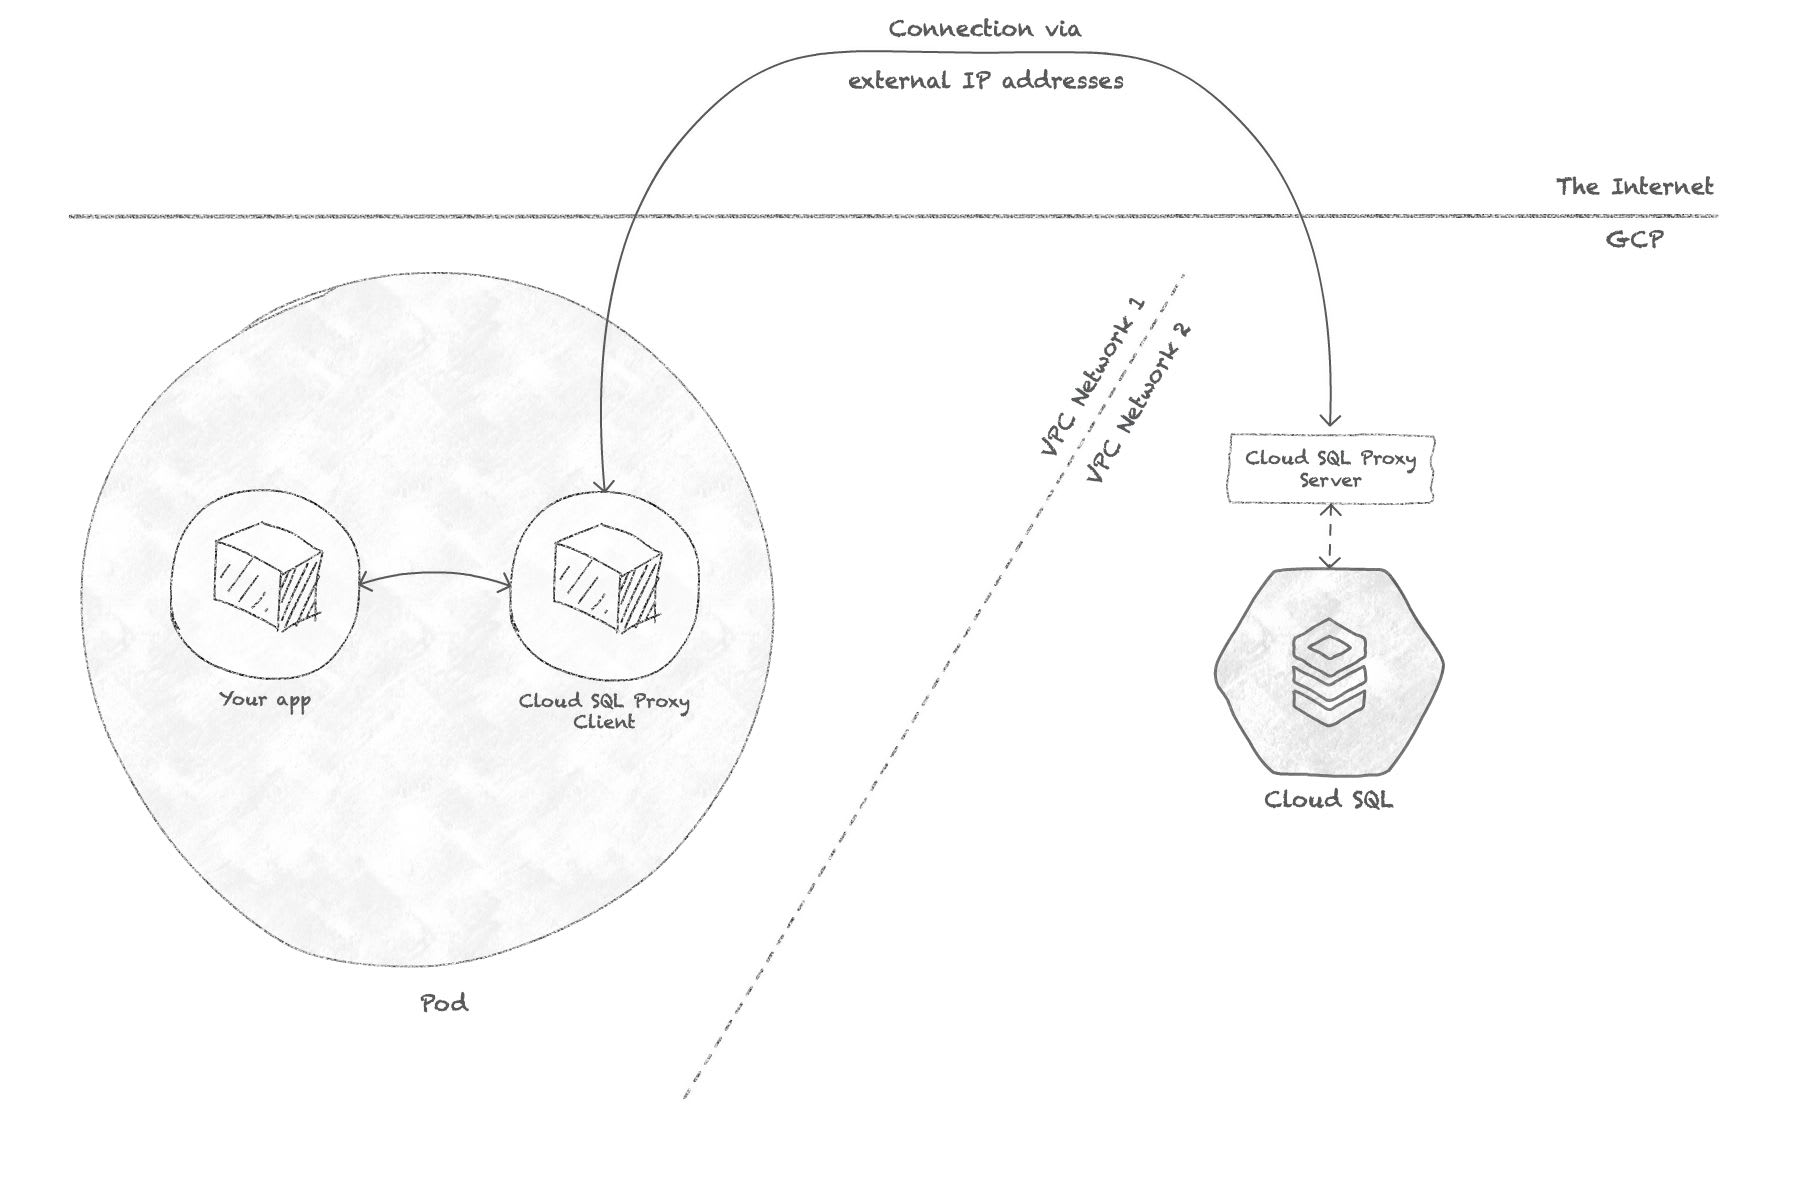
It's not too hard to have that "sidecar" container run in your pod along with your service, nor to maintain it, however I've had issues in production with it, specifically when doing rolling updates of my service: the Cloud SQL Proxy container is generally killed too quickly, resulting in a lost DB connection within my service as it is still handling a few requests before being updated.
There probably is a way to make this better, but I'm happy with the following solution that is more efficient, more secure, and doesn't use the proxy.
Private connectivity
Check the "Private IP" option; it will ask you to enable a new API, which you should accept and wait until you get to this state:
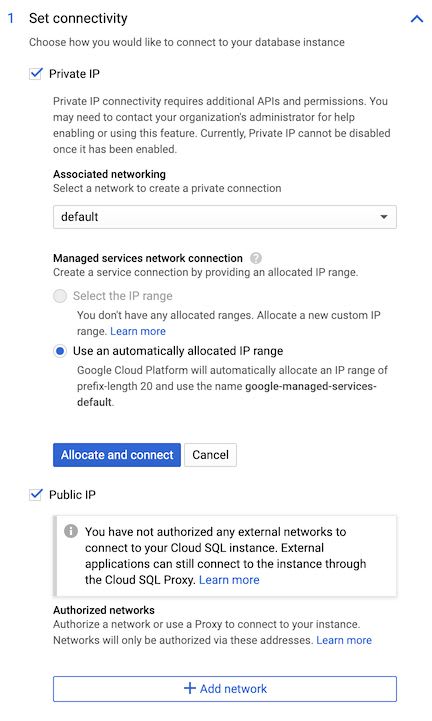
You can then click on "Allocate and connect" to finalize the private IP connectivity.
What this is doing, is creating a peering connection between your cluster's network and Google's network where your Cloud SQL instance resides. This connection is private and not accessible from the outside, so it's more secure. Because it's a connection between two Google private networks, it's also faster.
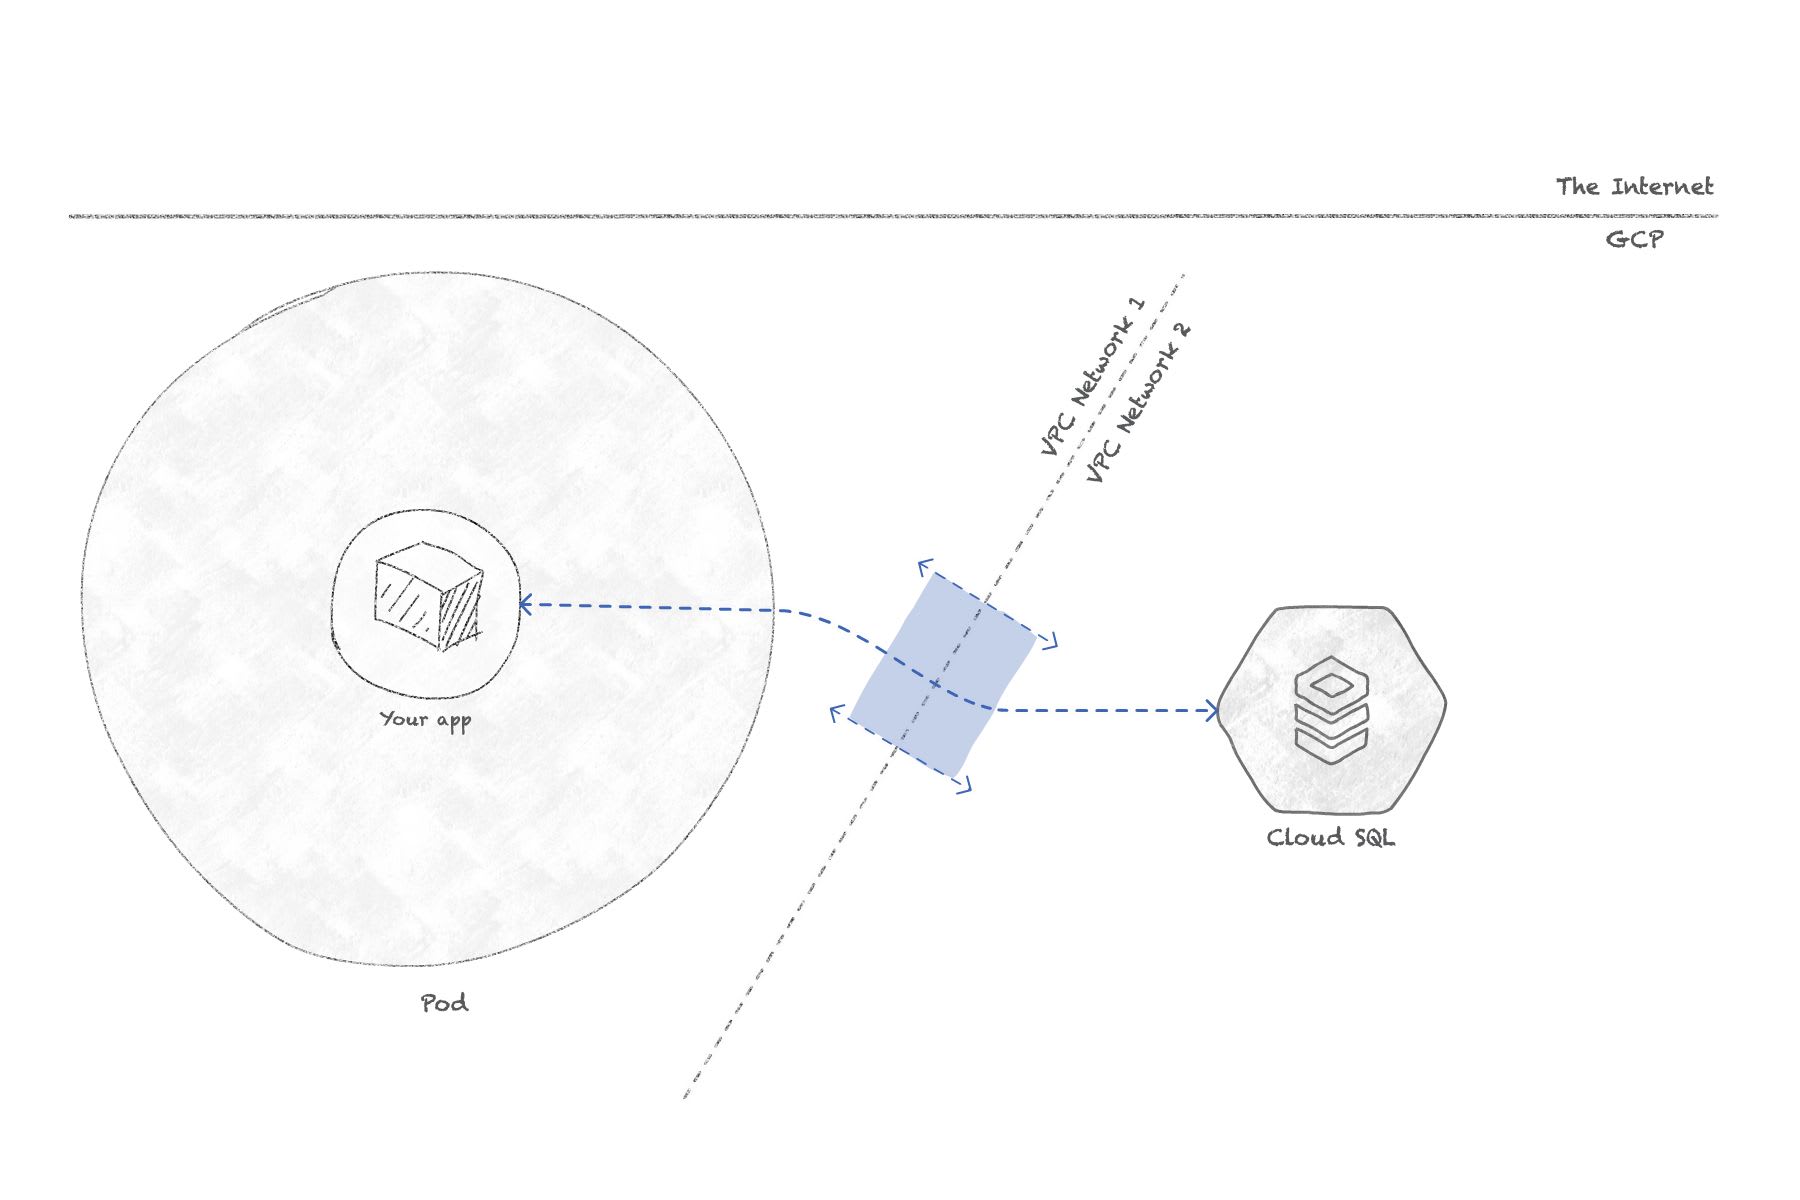
Concretely, this will allow us to connect Wordpress to its database directly, by using the private IP address generated for the SQL instance. No need for the Cloud SQL Proxy anymore, so that's again faster because there will be less network overhead for each SQL query.
Machine type
Just like the node pool's instance type, you must choose a machine type that will coincide with the expected load of your database(s).
For my Wordpress tests, I chose the smallest available machine type.
User & Database creation
After you create the Cloud SQL instance, it will take a few minutes before it's ready. Once it is, click on your instance name and go to the "Users" tab.
There, click "Create user account" and create a user named wordpress with a new password, with access from any host.
In the "Databases" tab, click "Create database" and create a wordpress DB.
Restricting DB access
Users created from the Cloud SQL Console are granted all privileges to all databases of the instance, which is a bit too much.
We're going to restrict our wordpress user's grants to the wordpress database only. To do that we need access to our MySQL instance, and Cloud Console provides just what we need: Cloud Shell.
Go back to the Overview tab of your MySQL instance, and click on the "Connect using Cloud Shell" button in the Connect to this instance tile:
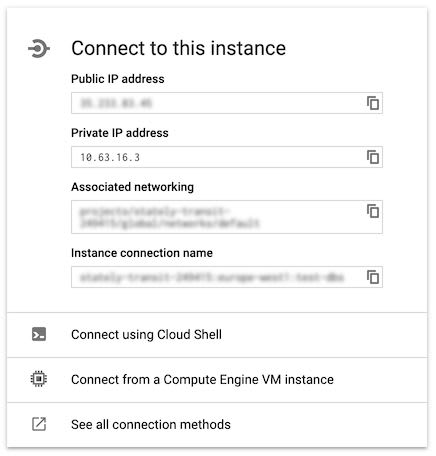
It will open a remote shell to a VM and launch a gcloud command to connect to the DB:

Type [Enter] to run the command. After some time, you'll be asked for your MySQL root password and a session will be started.
Type the following SQL instructions to adjust the privileges of your wordpress user:
revoke all privileges on *.* from wordpress;
grant all privileges on wordpress.* to wordpress@'%';
flush privileges;
Everything is ready!
Go back to the "Overview" tab and note down the Private IP Address of your instance for the next part.
Part 2: deploying
We've set up our basic infrastructure in the first part: a Kubernetes cluster and its node pool, a Cloud SQL instance with an empty database.
We've configured everything to be able to deploy Wordpress efficiently, so that's what we'll do now!
Deployment
We still have a few steps to go through:
- Manage sensitive information such as DB passwords
- Deploy and configure Wordpress
- Store Wordpress'
wp-contentdata on a persistent disk - Expose our Wordpress instance to the Internet
Storing our DB password in a k8s secret
It's always a good practice to handle sensitive information securely!
Kubernetes has a feature for this, called secrets. It provides secure storage for sensitive information, which can be made available to containers through environment variables or mounted files.
We're going to use this to provide our DB password to Wordpress.
It requires a little preparation first.
Install gcloud CLI & kubectl
Handling secrets cannot be done from the Cloud Console, so it's time to use Google Cloud's command-line interface:
- Follow one of the quick-starts to install the
gcloudutility on your computer - Make sure you login, initialize the SDK (it should be the last steps of the above guide) and set the default project and default region/zone when requested
- Once it's done, run
gcloud components install kubectlto installkubectl, which is the Kubernetes utility - Now you can use
gcloudto generate the configuration forkubectlto connect to your cluster:gcloud container clusters get-credentials <your cluster name>
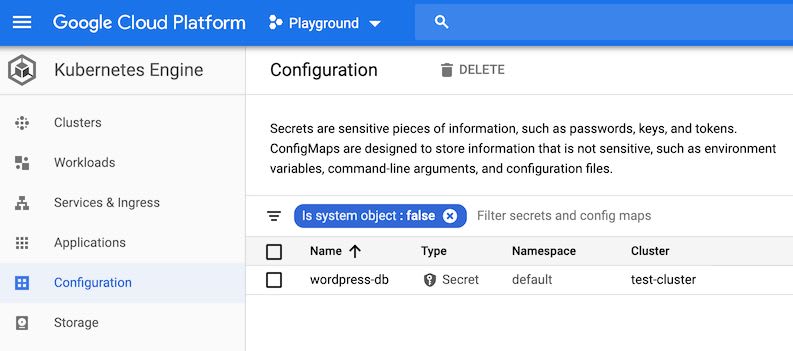
Creating the secret
A secret is an object with a type, a name, and the data you want to store securely.
In our case, we need a "generic" secret for which the data consists of key/value pairs; the other types are for very specific applications and out of our scope today.
We only have our DB password to store, so it's going to be a single "literal" value:
$ kubectl create secret generic wordpress-db --from-literal=DB_PASSWD="<password>"Once you've run this command, you can see that the secret has indeed been created by going to Kubernetes Engine > Configuration:
Deploying Wordpress
It's time to deploy for real!
Let's go to Kubernetes Engine > Workloads and click "Deploy" to create your first deployment:
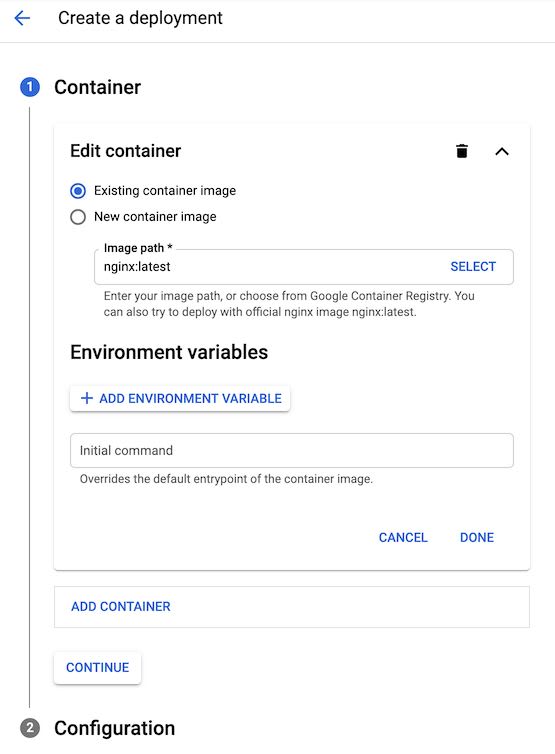
Image path
We'll use the official Wordpress image: wordpress:latest
Environment variables
Let's set a few environment variables:
WORDPRESS_DB_HOST: use the Private IP Address of your Cloud SQL instance created in Part 1.WORDPRESS_DB_USER: set it towordpress, or whatever user name you used in the MySQL instance setup earlierWORDPRESS_DB_NAME: set it towordpress, or whatever DB name you chose in the previous part
As we can't set up an environment variable from a Kubernetes Secret in this form, I left out WORDPRESS_DB_PASSWORD on purpose: we will have to add it to the deployment manifest later. So your form should now be similar to this:
Click "Done" to validate the container settings, then "Continue" to open the Configuration panel, in which you just have to change your application name to something more meaningful.
Understanding the generated YAML manifests
If you're curious, you can click "View YAML" to preview the manifest file that will be generated by the form. It contains three objects:
- A
ConfigMapthat holds the key/values for our environment variables. It is not mandatory to use configuration maps to define environment variables for a container, but the advantage is that it makes the values available to other deployments/containers.
You'll find the existing configuration maps in Kubernetes Engine > Configuration next to the secret we created earlier. - The
Deploymentitself, which specifies the container(s) and the number of replicas to deploy. Google will by default create 3 pods (replicas: 3) out of thetemplate/specdata from that manifest.
In that spec you can see the image name you've specified and the environment variables. - And finally a
HorizontalPodAutoscalerobject, which will handle horizontal scaling of your pod automatically depending on some metrics that it will monitor. In this default setup, Google specifies that Kubernetes may run from 1 to 5 pods depending on theircpuusage, which should be at a 80% average to be considered normal.
Deploy!
Make sure the selected cluster is the one we created before, and click the "Deploy" button.
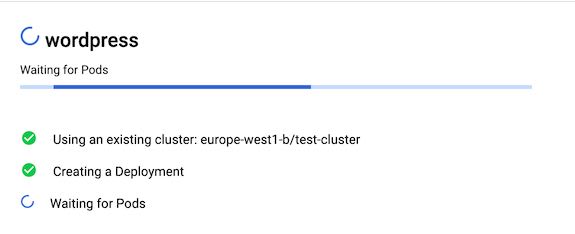
It will take a minute before everything's ready, then you will be redirected to the newly created deployment's details page.
Scale down (optional)
As we saw in the YAML manifest, GKE will automatically create 3 pods for our deployment. That's fine when deploying for production, but if you're running tests like I am, you might want to reduce the load to a single pod.
From the Deployment Details page:
- Click "Actions" then "Autoscale" and disable the autoscaler
- Click "Actions" then "Scale" and set Replicas to 1
Provide DB password to the container
If you click on the pod's name under Managed pods (still from the deployment details page) and check out its logs by clicking the "Logs" tab, you should see a repetition of the same message:
WARNING: unable to establish a database connection to '10.63.16.3'
and/or:
MySQL Connection Error: (1045) Access denied for user 'wordpress'@'10.52.1.5' (using password: NO)
That's because we haven't provided the DB password to the container yet, so let's do it:
- Go back to the Deployment details and click "Edit"
- You're sent to an editor for the deployment's YAML description.
- Double check that the
kindfield saysDeployment; if it saysPod, you probably clicked "Edit" from the Pod details page, so go back and try again 🙂 - Towards the middle of the file, you'll find the environment variables we had set when creating the deployment.
Copy and paste the following in there:
        - name: WORDPRESS_DB_PASSWORD
          valueFrom:
            secretKeyRef:
              key: DB_PASSWD
              name: wordpress-db
This will tell Kubernetes to fetch the value for the WORDPRESS_DB_PASSWORD environment variable from the DB_PASSWD key of the secret we created earlier.
Click "Save" and wait for the new pod to be created.
If you look at its logs now, it should say that Wordpress has been installed, and Apache started.
Checking that it worked
To check that our deployment worked, we'll load the Wordpress setup page!
We don't have a public IP to serve traffic from our pod yet, but kubectl provides an easy way to forward a local port of our machine directly to the pod.
Let's first get the name of the pod. You can copy it from Cloud Console or use kubectl get pods to list all your running pods in your cluster. Mine is called wordpress-d74bfbbc4-js5df.
I'm going to redirect my local port 8080 to the pod's port 80 this way:
kubectl port-forward pod/wordpress-d74bfbbc4-js5df 8080:80Note: don't go through the setup steps: Wordpress will automatically use the host and port you're using to access the setup to save what should be the canonical URL of the blog. It might make the blog harder to reach later when we try to access it through a public IP.
If you got everything right it should only take a second, and you should be able to load http://localhost:8080:
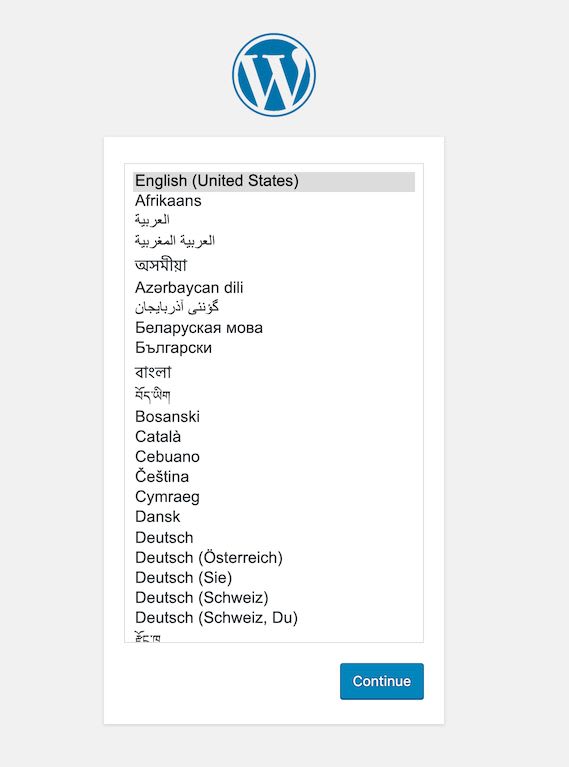
It works! 🎉
The last step for this guide is to actually expose the pod via a service so that we can access the blog from the Internet.
Exposing the deployment
Services
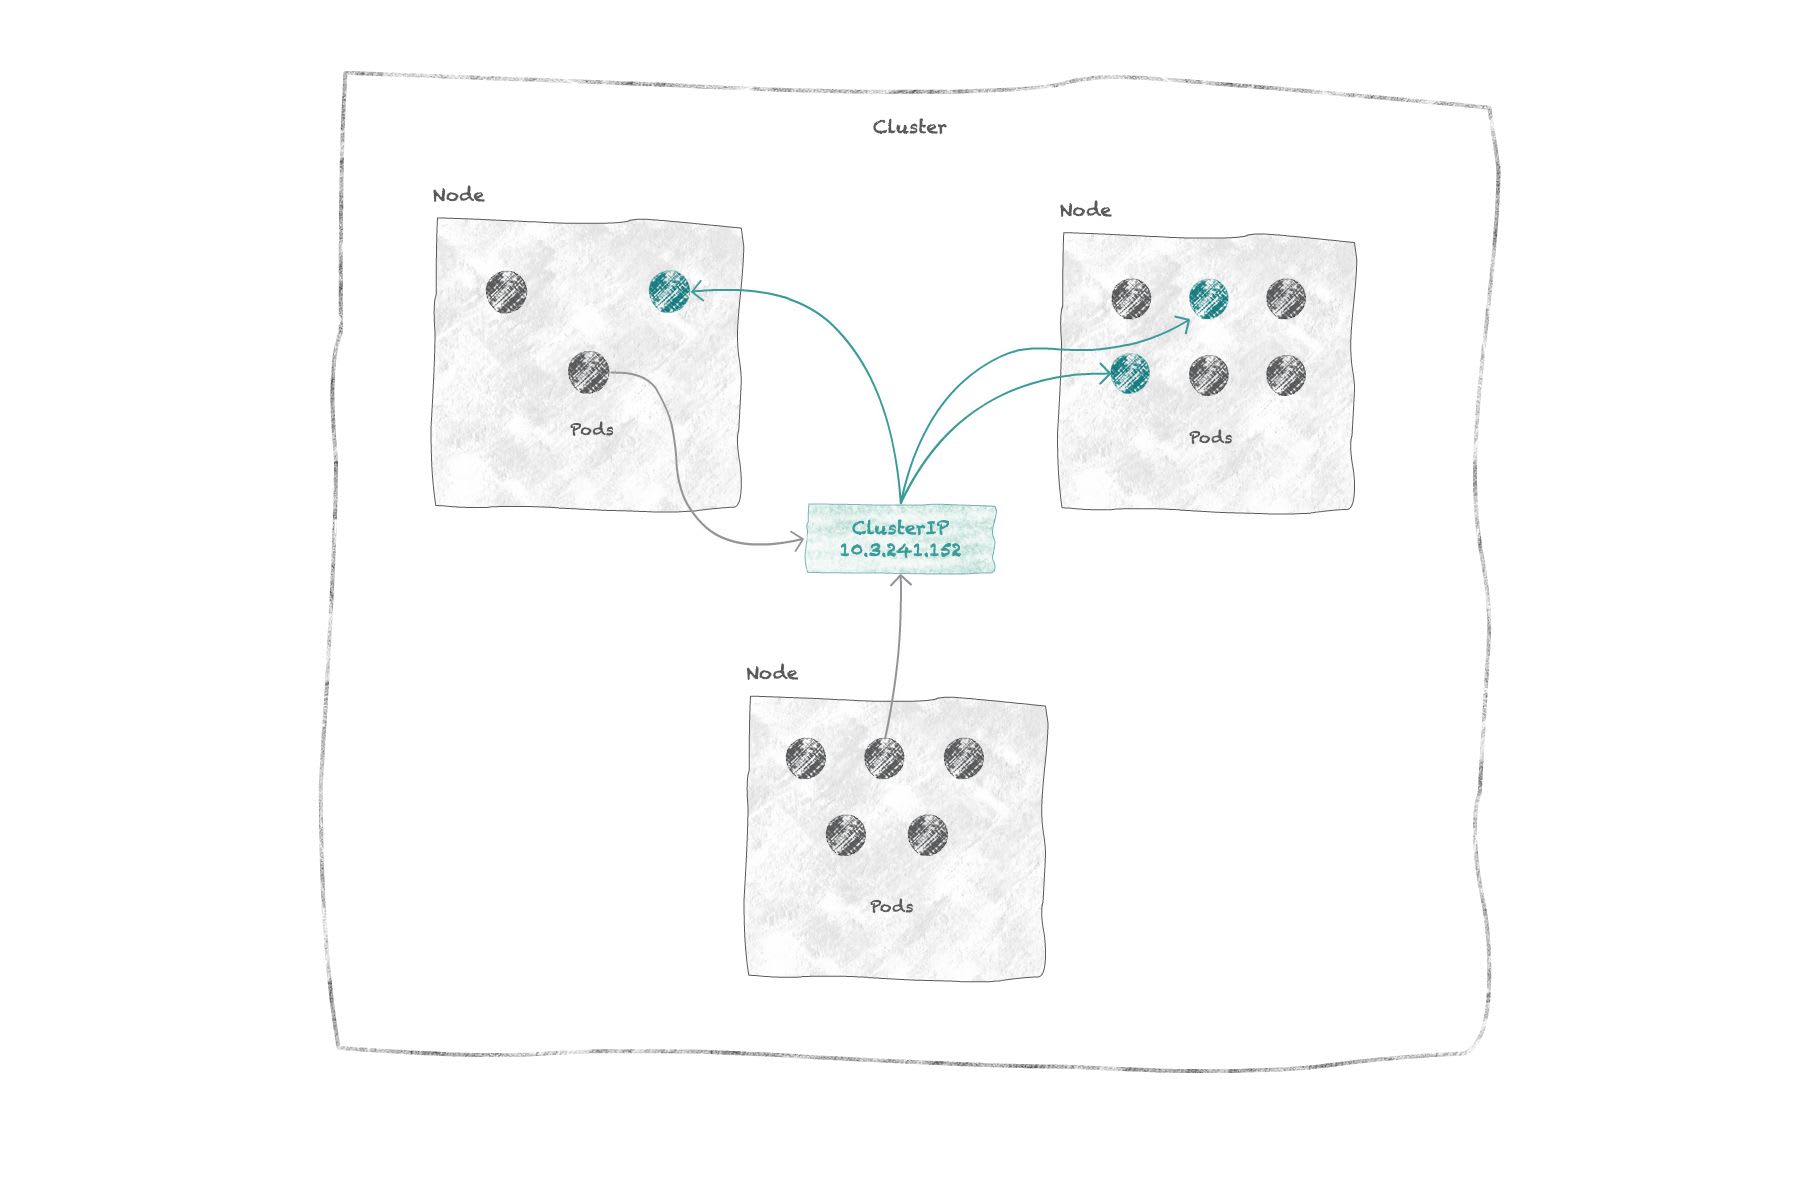
As pods are ephemeral and can be deleted/rescheduled at any time, it's hard to maintain an interface between a deployed application and the "outside" (other pods or the Internet) without a fixed layer.
Services play that role: they are bound to a logical group of pods and provide a single, stable IP address to be able to consistently route traffic to the pods that exist for that service at the time the request comes in.
When there are multiple pods to target, they're able to round-robin requests between them. We'll see in a bit how a service knows which pods to target.
There are three service types we can use to expose a deployment:
ClusterIP: exposes the deployment to an IP address that is internal to the cluster. Useful when your deployment should only be reachable by other deployments from within the cluster.
NodePort: exposes the deployment on each of the cluster's nodes by opening a "node port" on the node's IP address. AClusterIPservice is automatically created to route from that node port to the pods. So if you have a node's external IP address, you can access your deployment with<node IP>:<node port>.
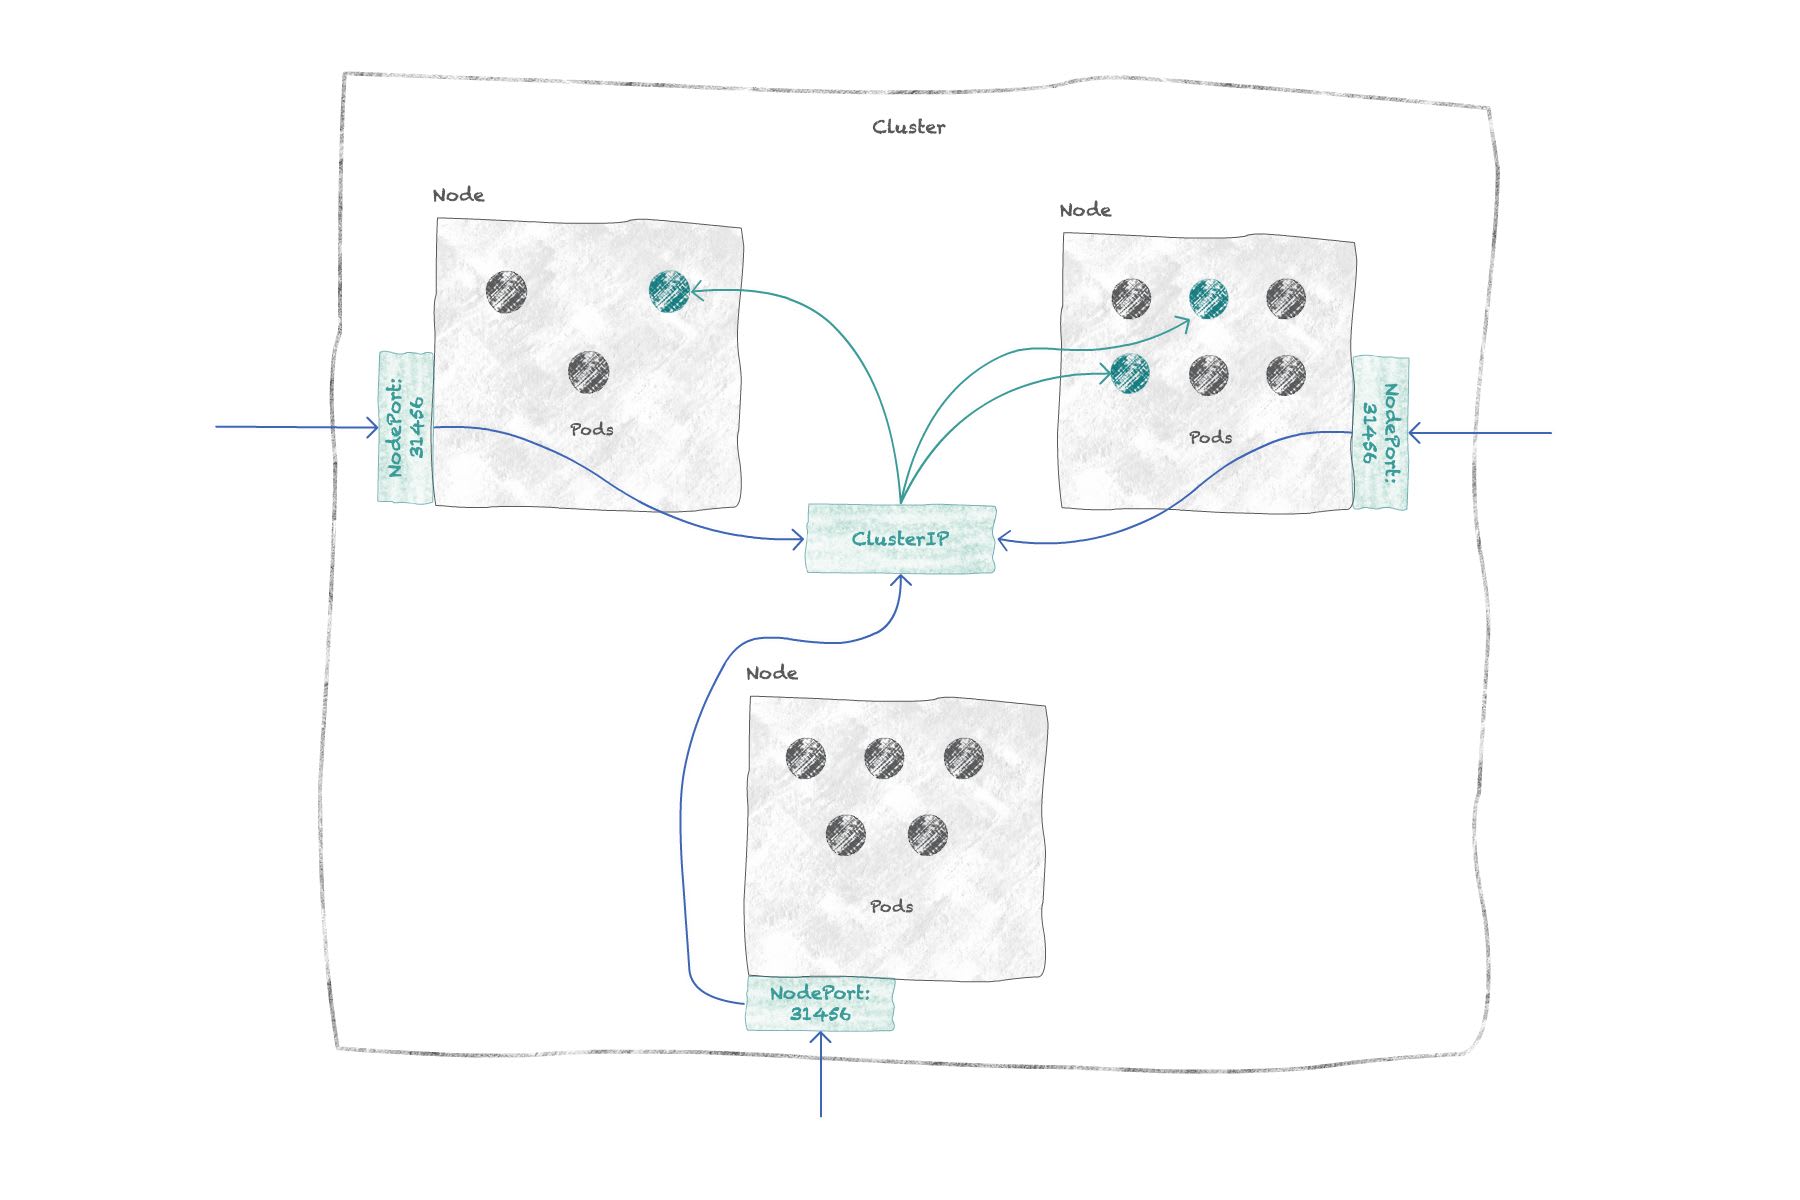
LoadBalancer: exposes the deployment externally by creating a load balancer accessible via a single (usually static) IP address. ANodePortservice and its associatedClusterIPservice are created automatically so that the load balancer can balance requests to each node.
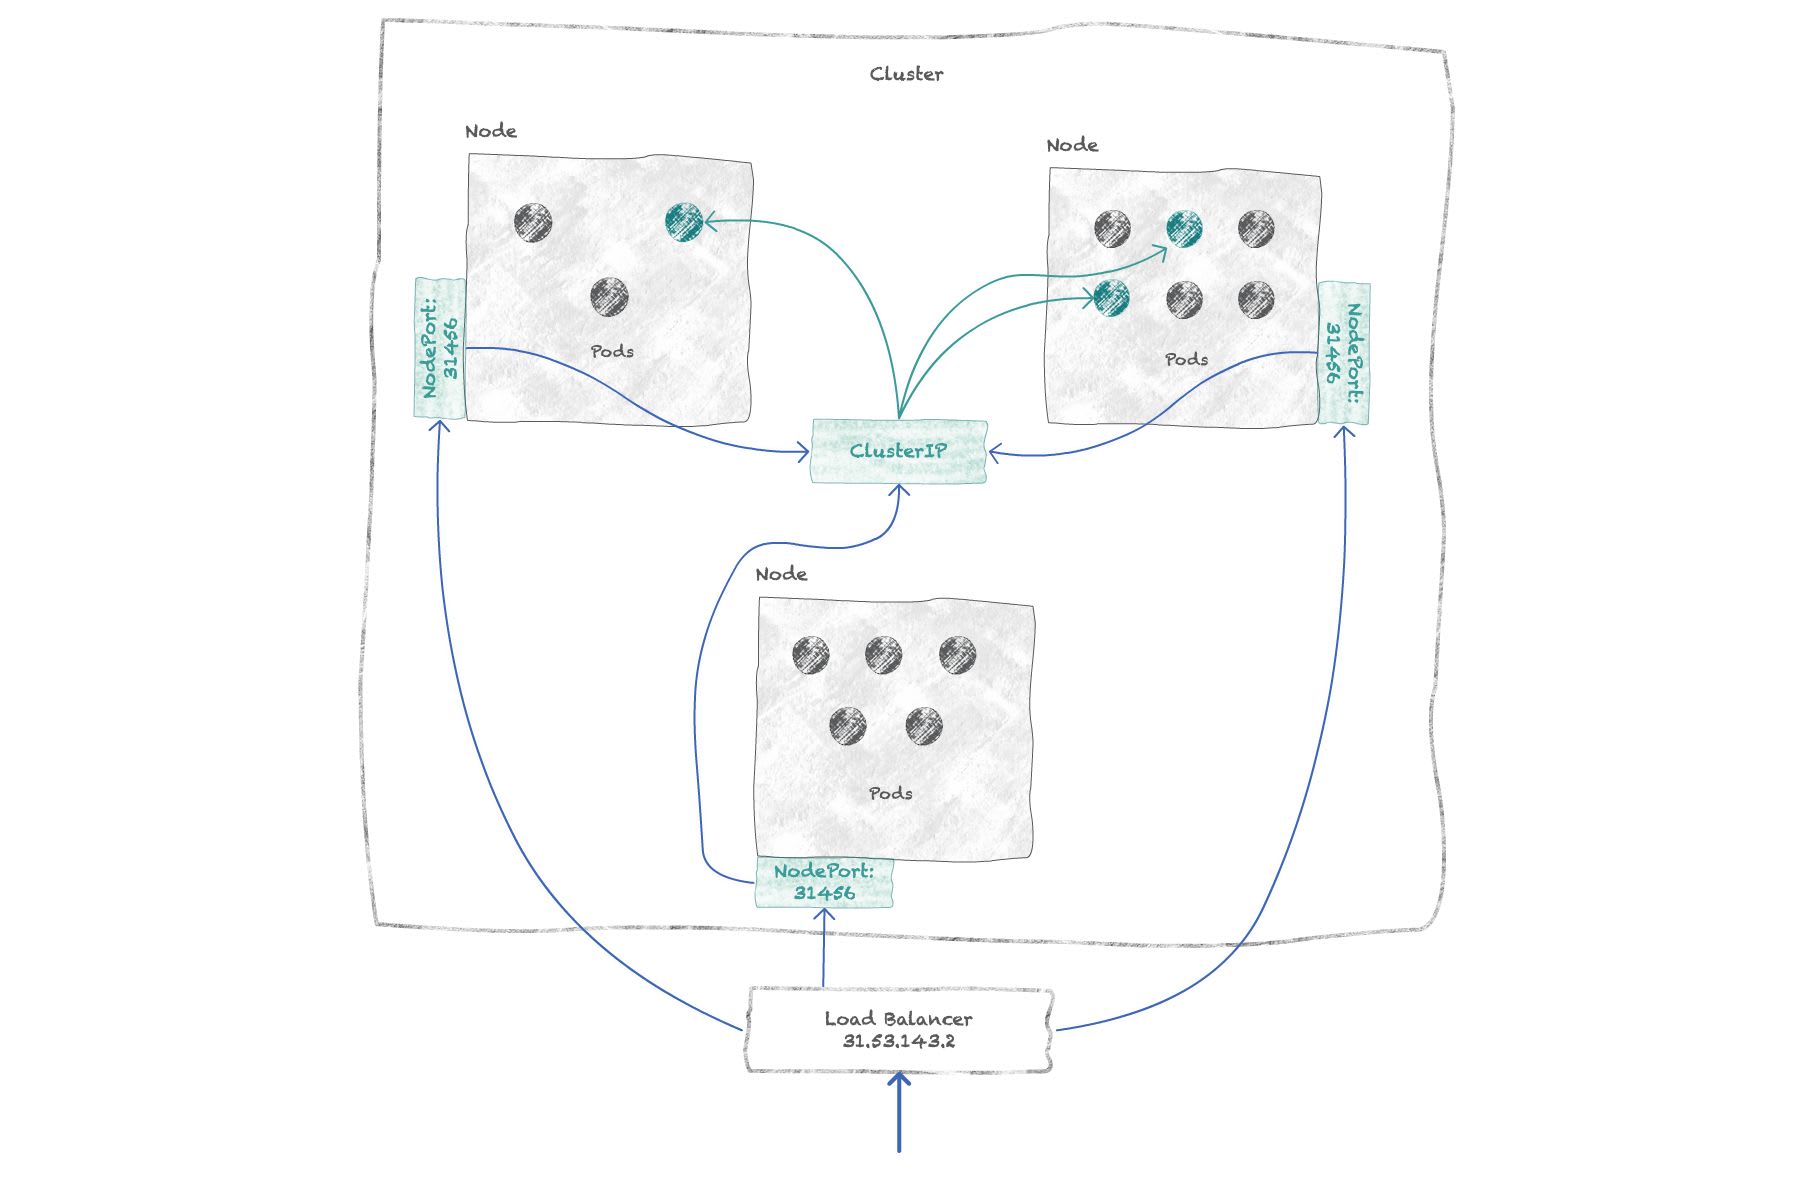
Concretely, services are materialized by a set of routing rules that map the IP address of a service to the addresses of the target deployment. An internal Kubernetes process, called kube-proxy, is in charge of creating those rules and keeping them in sync with the IP addresses of live target pods.
If you want to dig more into this subject, I recommend reading this post: Understanding Kubernetes networking: services.
One exception is the external Load Balancer itself, which must be provided by the cloud provider to route traffic to the nodes.
Creating our service
To keep thing simple, we will use the LoadBalancer service type for our Wordpress deployment.
In a real production environment, I'd probably use a NodePort service because it lets me configure an HTTP(s) Load Balancer in front of it, which provides very useful features the "basic" TCP Load Balancer used by LoadBalancer services do not provide (such as SSL certificates support, host- & path-based routing, ...).
This is however better kept out for another time.
So let's expose our deployment.
Go back to Kubernetes Engine > Workloads and open the details page of your wordpress deployment.
There, you should see a banner saying "To let others access your deployment, expose it to create a service":

Click the "Expose" button.
If it's not there, click the Actions > Expose menu item in the header menu.
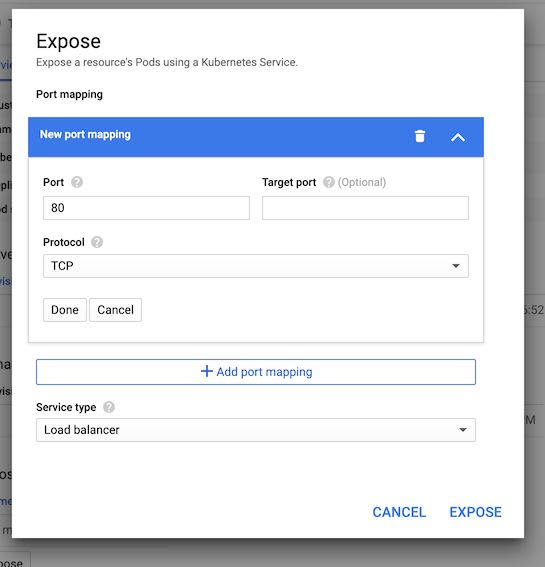
Leave the default configuration as-is, but choose the "Load balancer" Service type in the dropdown.
Click "Expose": you're redirected to the Service details page, where you can see that things are being created. It will take several minutes to be fully up.
Understanding the Service YAML manifest
While GCP is spinning up machines, allocating IP addresses and creating routes and firewall rules for your service to work, take a look at the YAML definition of the service itself.
I'll copy the spec part here:
spec:
  clusterIP: 10.119.13.142
  externalTrafficPolicy: Cluster
  ports:
  - nodePort: 32647
    port: 80
    protocol: TCP
    targetPort: 80
  selector:
    app: wordpress
  sessionAffinity: None
  type: LoadBalancer
Key things to note:
- The last line shows we've created a
LoadBalancerservice - The
selectorobject tells the service how it can find pods to send traffic to: they're the ones with theapplabel with valuewordpress!
You could imagine having an additionalenv: productionin there for instance, if you wanted to have deployments and services for different environments. - You should understand the
portsobject from the previous paragraph/diagram: a load balancer listens toport: 80on an external IP address (automatically allocated, so not part of the manifest); it will balance traffic to nodes onnodePort: 32647through aNodePortservice, which in turn will send traffic to theClusterIPservice onport: 80, so that the request can finally be sent to a pod ontargetPort: 80.
Going to our blog
If you haven't done it already, kill the kubectl port-forward command from earlier.
When the service is fully ready, from the Service details page, you'll find an External endpoints line with the IP address of the load balancer as a clickable link.

Well. Click it ☺️
If everything is really fully ready, your blog setup page should load again.
Congrats!
Troubleshooting
If it doesn't, here are two things that might be the cause:
- The load balancer might not be fully ready. Give it another 5 to 10 minutes and try again ☕️
- If you're using Chrome and used
kubectl port-forwardearlier, try Safari or Firefox, or open the Chrome Dev Tools and check "Disable cache" before reloadinghttp://<ip address>(make sure to remove any trailing:8080).
I did face this issue: somehow, maybe from tests, Chrome had cached that it should use the8080port for that website and showed a301 redirectfrom "disk cache" in the network requests when I tried to load the blog through the new, unseen before public IP address.
Using a custom domain name
"IP addresses are fun to remember", said nobody.
If you want to make your blog (or whatever you pushed to prod) official, you will most likely want to point your domain name to it.
Then you're not exactly done yet, because your load balancer currently uses an ephemeral IP address. So it's subject to change!
To make it a static IP, go to VPC Network > External IP addresses.
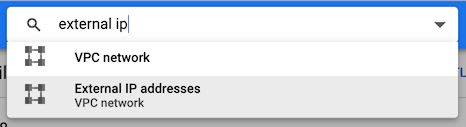
There, you'll find the ephemeral IP address that's just been allocated to the load balancer for your service. It should say it's in use by a forwarding rule.
The others are your nodes' IP addresses.
Locate your load balancer IP address, click the "Ephemeral" dropdown and choose "static" instead:

You'll be asked to give your static IP a name.
Choose one, click "Reserve", and you'll have a permanent IP address for your Wordpress blog.
Copy the IP address, go over to your domain name registrar and change the A record of the domain to the new IP address you just reserved.
Done!
